> ## Documentation Index
> Fetch the complete documentation index at: https://brightdata-ipv6-release.mintlify.site/llms.txt
> Use this file to discover all available pages before exploring further.
# Proxy Manager集成
> 了解Bright Data的Proxy Manager集成选项以及一些最佳使用窍门。
## 与第三方应用程序集成
Proxy Manager是一个开源项目,可以安装在各种环境中,用作任何应用程序的代理服务器。
以下是几个在第三方应用程序中使用Proxy Manager作为代理服务器的示例。
与任何第三方应用程序集成,是无需用户名和密码的,可以将username:password留空,因为Proxy Manager中的每个端口都保留了所使用区域的凭据。
```js 端口24000的示例 theme={null}
IP:PORT:USERNAME:PASSWORD → 127.0.0.1:24000:[empty]:[empty]
```
## 集成到您的手机
1. Android设备和使用Proxy Manager的计算机需要共享相同的WiFi连接
2. Proxy Manager端口必须将Android设备的IP列入白名单
3. 转到WiFi网络配置 -> 高级 -> 手动代理:
* 代理主机:运行Proxy Manager的计算机的IPv4地址
```sh CMD theme={null}
ipconfig
```
```sh Shell theme={null}
ifconfig
```
* 端口:24000(或您创建的其他端口)
1. iPhone and the machine using the Proxy Manager need to share the same WiFi connection
2. Whitelist the iPhone IPv4 in the Proxy Manager under '一般信息'\
To find IPv4 follow these instructions:
* Go to wifi settings
* tap on the blue `i` icon next to your network's name
* See your IP address
3. Open the Settings app and go to WiFi
4. Tap the name of the WiFi network you're connected to
5. Scroll to the bottom and you will find a section for HTTP Proxy. This is set to 'off' by default. Set it 'Manual' for manually configuring the proxy settings
6. In the server slot enter the IPv4 address of the server where the Proxy Manager is installed
7. In the port slot enter `24000` (or other port you create)
## 与Puppeteer集成
* 以您想使用的网络、IP类型和IP数量创建一个区域。
* 安装Proxy Manager。
* 点击“添加新代理”,选择所需的区域和设置,点击“保存”。
* 在Puppeteer中,在“proxy-server”下输入您的本地IP和Proxy Manager端口(例如`127.0.0.1:24000`)
* 本地主机IP是`127.0.0.1`
* 在Proxy Manager中创建的端口是`24XXX`,例如`24000`
* 将用户名和密码值留空,因为Bright Data Proxy Manager已经通过超级代理进行验证。
```js 代码示例 theme={null}
const puppeteer = require('puppeteer');
(async () => {
const browser = await puppeteer.launch({
headless: false,
args: ['--proxy-server=127.0.0.1:24000']
});
const page = await browser.newPage();
await page.authenticate();
await page.goto('https://lumtest.com/myip.json');
await page.screenshot({path: 'example.png'});
await browser.close();
})();
```
## 与Selenium集成
* 以您想使用的网络、IP类型和IP数量创建一个区域。
* 安装Bright Data Proxy Manager。
* 点击“添加新代理”,选择所需的区域和设置,点击“保存”。
* 在Selenium中,在setProxy下输入您的本地IP和Proxy Manager端口(例如127.0.0.1:24000)
* 本地主机IP是127.0.0.1
* 在Proxy Manager中创建的端口是24XXX,例如24000
* 将用户名和密码字段留空,因为Bright Data Proxy Manager已经通过超级代理进行验证。
```js theme={null}
const {Builder, By, Key, until} = require('selenium-webdriver');
const proxy = require('selenium-webdriver/proxy');
(async function example() {
let driver = await new Builder().forBrowser('firefox').setProxy(proxy.manual({
http: '127.0.0.1:24000',
https: '127.0.0.1:24000'
})).build()
try {
await driver.get('https://lumtest.com/myip.json');
driver.switchTo().alert().accept();
} finally {
await driver.quit();
}
})();
```
## 与Insomniac浏览器集成
* 转到端口设置中的一般信息选项卡
* 在倍增代理端口字段中,选择要创建的代理端口数量。这将创建具有相同设置的多个代理端口
* 您的电子表格包含以下的列:
* 自定义名称:为每个代理添加名称
* Host: `127.0.0.1`
* Port: `24XXX`
* 用户名、密码和标签:留空
Proxy Manager已经通过超级代理进行验证
* 将文件保存为CSV格式,而不是XLS或XLSX格式
* 在Insomniac的Proxy per tab扩展程序中,进入管理代理列表,然后选择批量添加代理
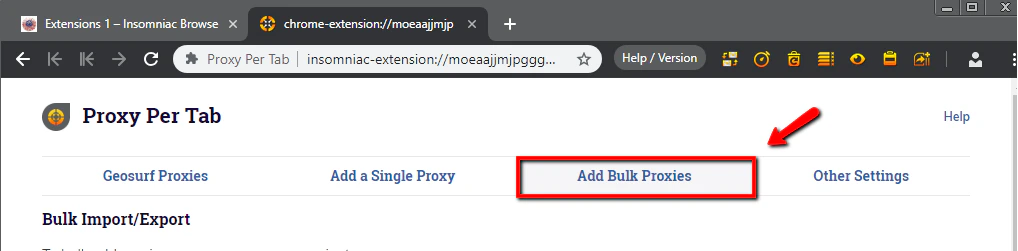 * 选择导入代理列表,并上传CSV文件
 ## 与Multilogin(MLA)集成
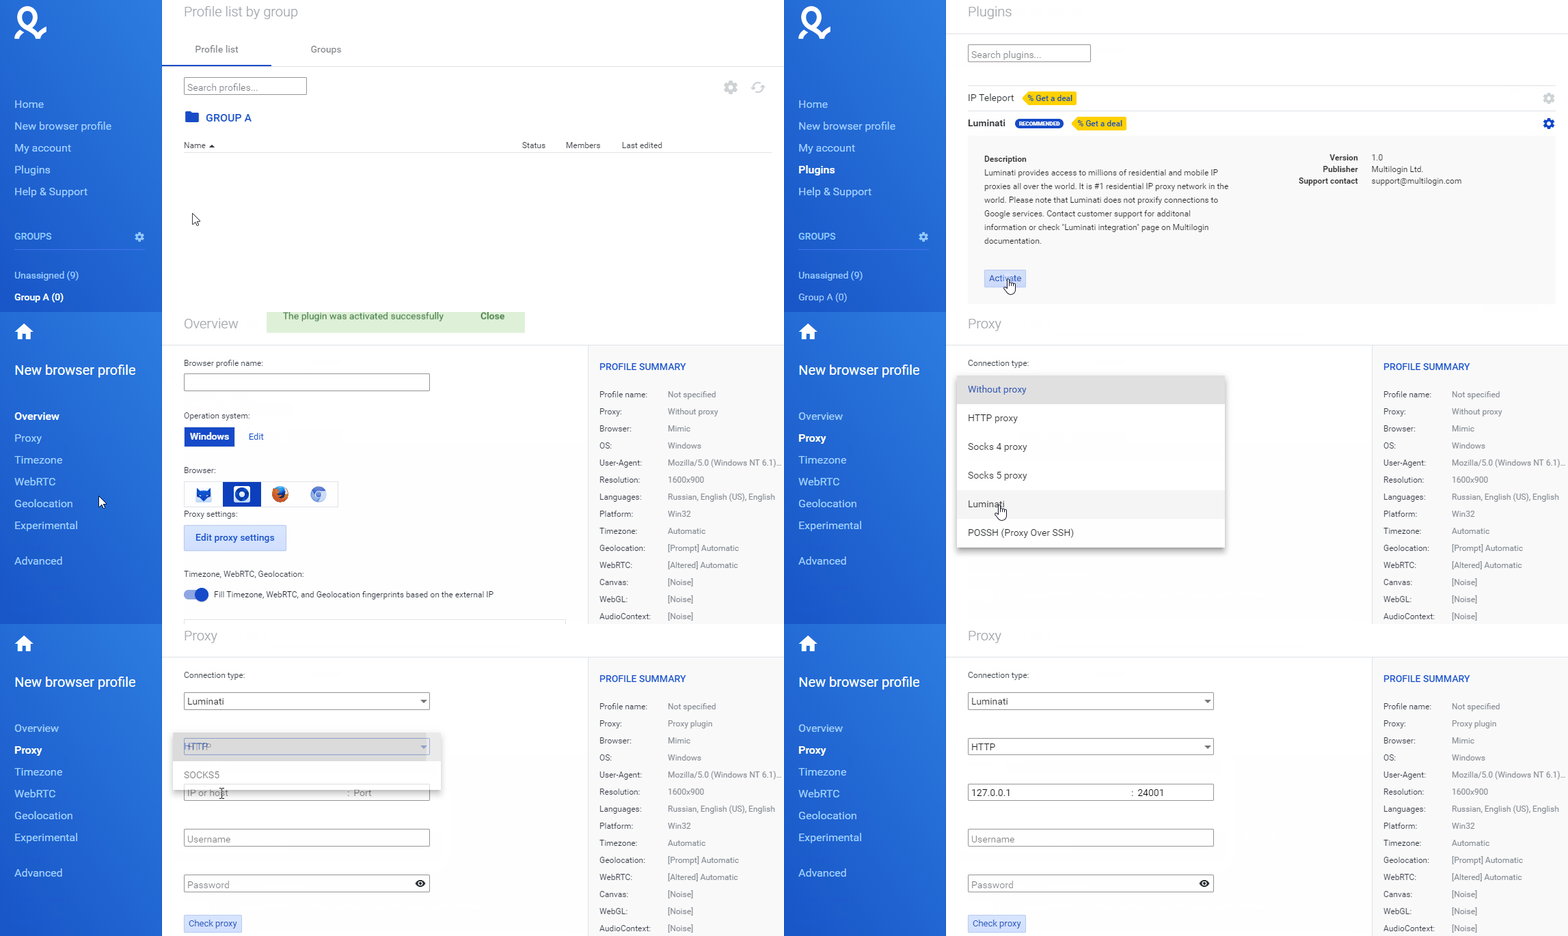
* 在Multilogin中,点击新建浏览器配置文件
* 点击编辑代理设置
* 在连接类型下选择Bright Data
* 在代理类型下选择您的协议
* 如果Proxy Manager是安装在本地,则IP或主机字段应输入127.0.0.1;或者,如果Proxy Manager是安装在远程服务器上,则请使用该服务器的IP1.1.1.1或example.com
* 端口:您在Bright Data Proxy Manager中创建的端口24XXX
* 将用户名和密码字段留空,因为Bright Data Proxy Manager已经验证
* 点击检查代理
## 与Multilogin(MLA)集成
* 在Multilogin中,点击新建浏览器配置文件
* 点击编辑代理设置
* 在连接类型下选择Bright Data
* 在代理类型下选择您的协议
* 如果Proxy Manager是安装在本地,则IP或主机字段应输入127.0.0.1;或者,如果Proxy Manager是安装在远程服务器上,则请使用该服务器的IP1.1.1.1或example.com
* 端口:您在Bright Data Proxy Manager中创建的端口24XXX
* 将用户名和密码字段留空,因为Bright Data Proxy Manager已经验证
* 点击检查代理
 ## 与Playwright Proxy集成
* 点击“添加新代理”,选择所需的区域和设置,点击“保存”。
* 在Playwright中,在“server”下输入您的本地IP和Proxy Manager端口(例如127.0.0.1:24000)
* 本地主机IP是127.0.0.1
* 在Proxy Manager中创建的端口是24XXX。例如24000
* 将用户名和密码值留空,因为Bright Data Proxy Manager已经通过超级代理进行验证。
* 例如:
```js 代码示例 theme={null}
const playwright = require('playwright');
(async () => {
for (const browserType of ['chromium', 'firefox', 'webkit']) {
const browser = await playwright[browserType].launch({
headless: false;
proxy: {
server: '127.0.0.1:24000',
username: '',
password: ''
},
});
const context = await browser.newContext();
const page = await context.newPage();
await page.goto('https://lumtest.com/myip.json');
await page.screenshot({ path: 'example.png' });
await browser.close();
}
})();
```
## 与Jarvee Proxy集成
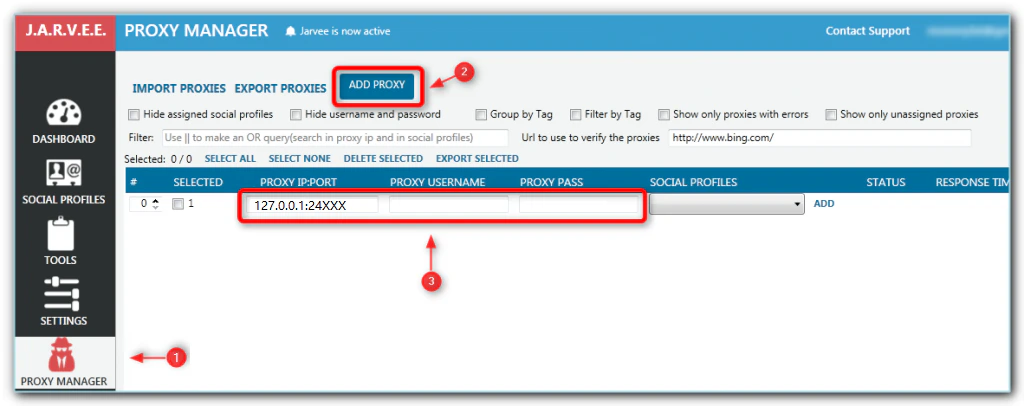
* 在Jarvee 左侧,选择“Proxy Manager”选项卡。
* 点击“添加代理”,在“选择代理IP:端口”列中输入IP:端口(例如127.0.0.1:24000)
* 本地主机IP是127.0.0.1
* 在Proxy Manager中创建的端口是24XXX,例如24000
* 将用户名和密码字段留空,因为Bright Data Proxy Manager已经验证
* 点击“验证代理链接”。
* 在“社交个人档案”下,选择您创建的Jarvee个人档案,然后点击“添加”按钮。
## 与Playwright Proxy集成
* 点击“添加新代理”,选择所需的区域和设置,点击“保存”。
* 在Playwright中,在“server”下输入您的本地IP和Proxy Manager端口(例如127.0.0.1:24000)
* 本地主机IP是127.0.0.1
* 在Proxy Manager中创建的端口是24XXX。例如24000
* 将用户名和密码值留空,因为Bright Data Proxy Manager已经通过超级代理进行验证。
* 例如:
```js 代码示例 theme={null}
const playwright = require('playwright');
(async () => {
for (const browserType of ['chromium', 'firefox', 'webkit']) {
const browser = await playwright[browserType].launch({
headless: false;
proxy: {
server: '127.0.0.1:24000',
username: '',
password: ''
},
});
const context = await browser.newContext();
const page = await context.newPage();
await page.goto('https://lumtest.com/myip.json');
await page.screenshot({ path: 'example.png' });
await browser.close();
}
})();
```
## 与Jarvee Proxy集成
* 在Jarvee 左侧,选择“Proxy Manager”选项卡。
* 点击“添加代理”,在“选择代理IP:端口”列中输入IP:端口(例如127.0.0.1:24000)
* 本地主机IP是127.0.0.1
* 在Proxy Manager中创建的端口是24XXX,例如24000
* 将用户名和密码字段留空,因为Bright Data Proxy Manager已经验证
* 点击“验证代理链接”。
* 在“社交个人档案”下,选择您创建的Jarvee个人档案,然后点击“添加”按钮。
 ## 与VMLogin Proxy集成
利用VMLogin的虚拟浏览个人档案,使用实体设备注册和管理多个在线账户,可以有助于反关联和规避指纹识别。
利用VMLogin的虚拟浏览个人档案,使用实体设备管理多个在线账户,可以有助于反关联和规避指纹识别。
以下是将Bright Data与VMLogin集成的分步指南:
* 在此处下载并安装VMLogin (3天免费试用): [https://vmlogin.us/?ref=luminati](https://vmlogin.us/?ref=luminati)
* 首先启动VMLogin,并创建一个新的浏览器个人档案:
* 点击“获取随机个人档案”
* 选择最适合您的设置,例如操作系统、屏幕分辨率、语言、WebGL供应商、时区、媒体设备指纹等。
## 与VMLogin Proxy集成
利用VMLogin的虚拟浏览个人档案,使用实体设备注册和管理多个在线账户,可以有助于反关联和规避指纹识别。
利用VMLogin的虚拟浏览个人档案,使用实体设备管理多个在线账户,可以有助于反关联和规避指纹识别。
以下是将Bright Data与VMLogin集成的分步指南:
* 在此处下载并安装VMLogin (3天免费试用): [https://vmlogin.us/?ref=luminati](https://vmlogin.us/?ref=luminati)
* 首先启动VMLogin,并创建一个新的浏览器个人档案:
* 点击“获取随机个人档案”
* 选择最适合您的设置,例如操作系统、屏幕分辨率、语言、WebGL供应商、时区、媒体设备指纹等。