> ## Documentation Index
> Fetch the complete documentation index at: https://brightdata-ipv6-release.mintlify.site/llms.txt
> Use this file to discover all available pages before exploring further.
> This article describes the options for getting the dataset once the snapshot is ready.
# Delivery options
To set your delivery preferences for the dataset, simply click on the 'Delivery settings' tab:
* Choose file format :
* JSON
* NDJSON
* CSV
* JSON lines
* Choose how to receive the data :
* Amazon S3 ([AWS S3 User Role Permissions](/datasets/custom-datasets/delivery-options#aws-s3-user-role-permissions))
* Google Cloud Storage ([How to find your google cloud Private Key](/datasets/custom-datasets/delivery-options#how-to-find-your-google-cloud-private-key))
* Google Cloud PubSub
* Microsoft Azure Storage
* SFTP/FTP
* Snowflake ([Snowflake Delivery Configuration Guide](/datasets/custom-datasets/delivery-options#snowflake-delivery-configuration-guide-only-visible-to-agents-and-admins))

You can also set delivery preferences per snapshot, to do that simply click on the snapshot and then click 'Export', set required storage parameters:

There is an option to download the dataset directly from the CP by clicking 'download + format' button:

## AWS S3 User Role Permissions
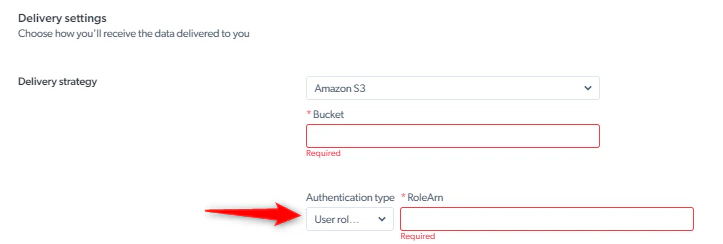 To control access to S3 resources, you can use IAM (Identity and Access Management) to create and manage AWS users and their permissions. One way to do this is by creating IAM roles and attaching them to S3 resources.
Go to the "Policies" section in the IAM console
To control access to S3 resources, you can use IAM (Identity and Access Management) to create and manage AWS users and their permissions. One way to do this is by creating IAM roles and attaching them to S3 resources.
Go to the "Policies" section in the IAM console
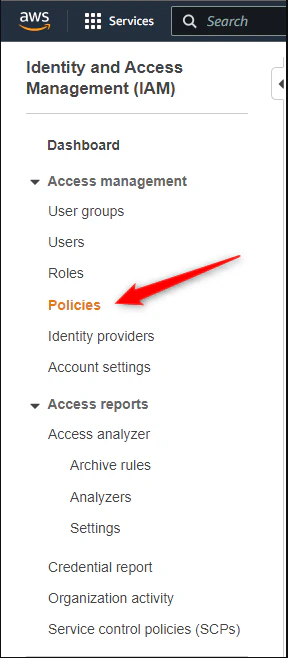 Create a new policy that defines the permissions for the S3 resources you want to grant access to.
Example of AWS policy:
```json theme={null}
{
"Version": "2012-10-17",
"Statement": [
{
"Effect": "Allow",
"Action": [
"s3:PutObject",
"s3:GetObject"
],
"Resource": "arn:aws:s3:::NAME-OF-YOUR-BUCKET/*"
}
]
}
```
Go to the "Roles" section in the IAM console
Create a new policy that defines the permissions for the S3 resources you want to grant access to.
Example of AWS policy:
```json theme={null}
{
"Version": "2012-10-17",
"Statement": [
{
"Effect": "Allow",
"Action": [
"s3:PutObject",
"s3:GetObject"
],
"Resource": "arn:aws:s3:::NAME-OF-YOUR-BUCKET/*"
}
]
}
```
Go to the "Roles" section in the IAM console
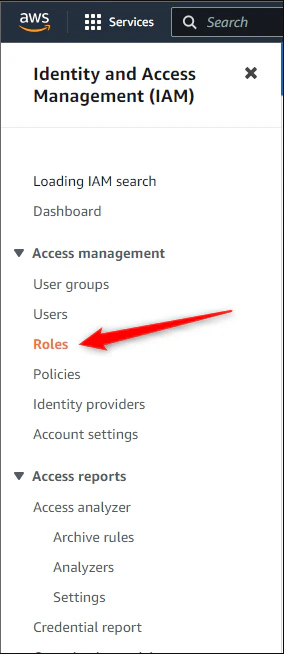 Create a new role and specify the policy created in step 1 in the "Permission policies" section.
Make a note of the ARN of the role, which will be used for delivery credentials. (The ARN will look like `arn:aws:iam:::role/`)
Example of User Role:
```json theme={null}
{
"Version": "2012-10-17",
"Statement": [
{
"Effect": "Allow",
"Principal": {
"AWS": "arn:aws:iam::422310177405:role/brd.ec2.zs-dca-delivery"
},
"Action": "sts:AssumeRole",
"Condition": {
"StringEquals": {
"sts:ExternalId": "YOUR EXTERNAL ID"
}
}
}
]
}
```
In the S3 resources that you want to grant access to, attach the role created in step 2 by using the ARN.
## How to find your Google Cloud Private Key
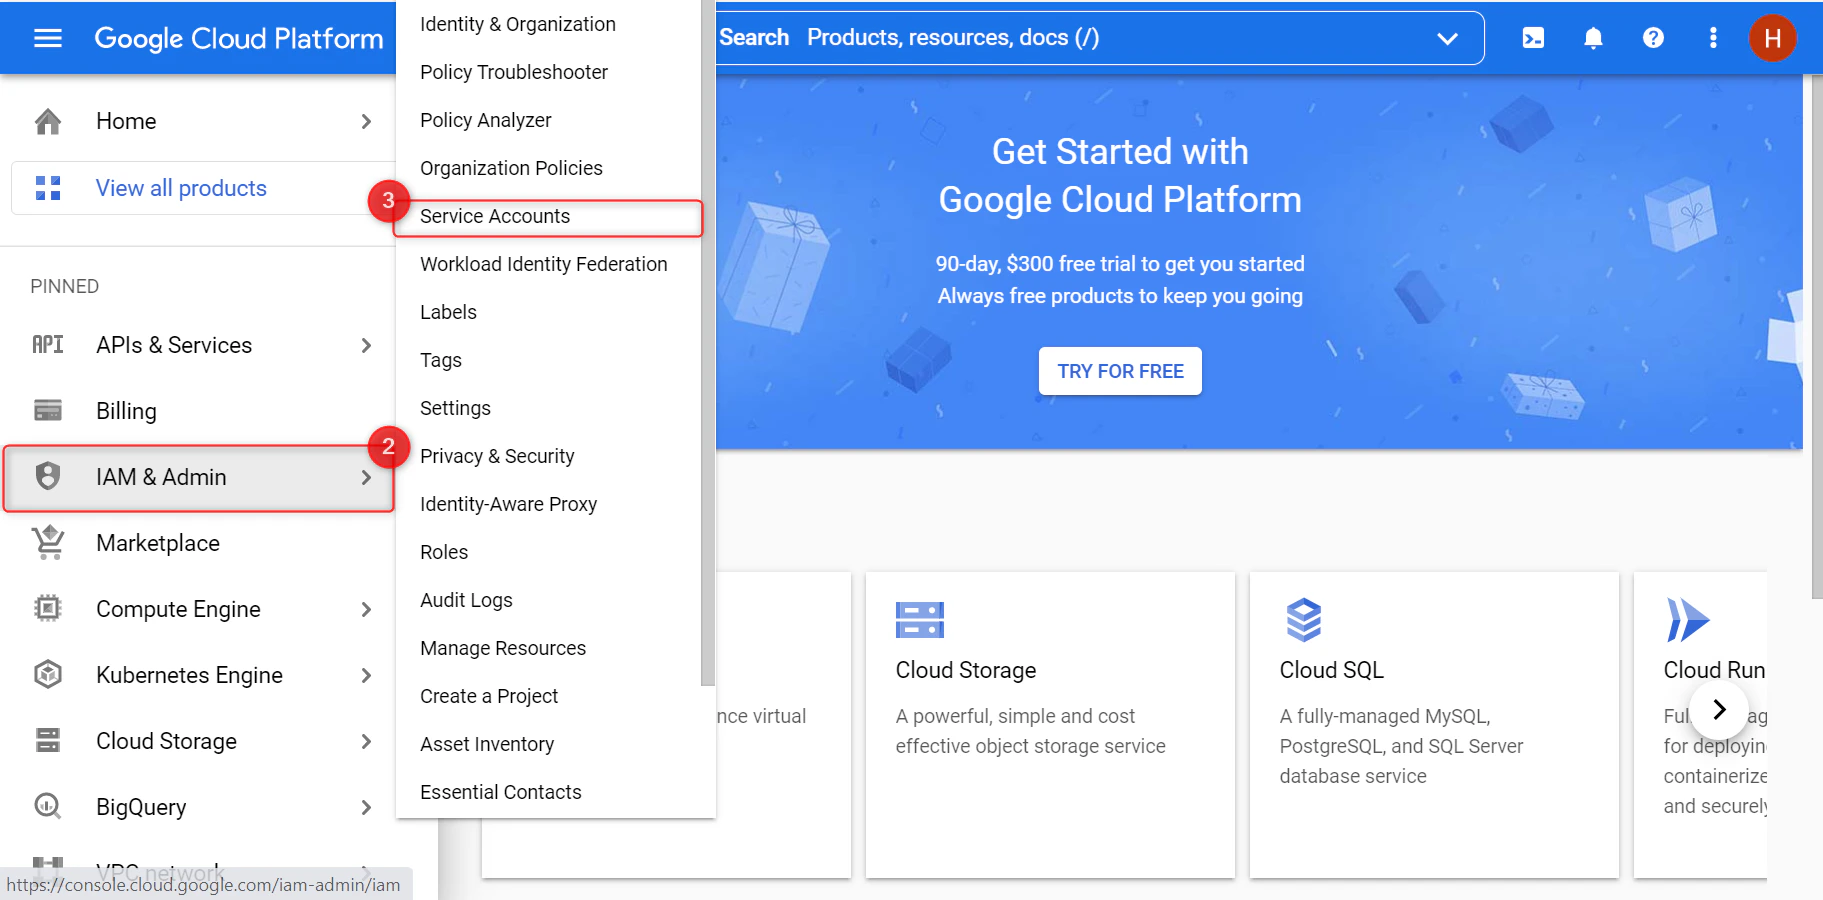
1. Go to the Google Cloud Platform Console home page - [https://console.cloud.google.com/](https://console.cloud.google.com/)
2. Expand the menu by Google Cloud Platform, and click IAM & Admin.
3. Click **Service accounts**.
Create a new role and specify the policy created in step 1 in the "Permission policies" section.
Make a note of the ARN of the role, which will be used for delivery credentials. (The ARN will look like `arn:aws:iam:::role/`)
Example of User Role:
```json theme={null}
{
"Version": "2012-10-17",
"Statement": [
{
"Effect": "Allow",
"Principal": {
"AWS": "arn:aws:iam::422310177405:role/brd.ec2.zs-dca-delivery"
},
"Action": "sts:AssumeRole",
"Condition": {
"StringEquals": {
"sts:ExternalId": "YOUR EXTERNAL ID"
}
}
}
]
}
```
In the S3 resources that you want to grant access to, attach the role created in step 2 by using the ARN.
## How to find your Google Cloud Private Key
1. Go to the Google Cloud Platform Console home page - [https://console.cloud.google.com/](https://console.cloud.google.com/)
2. Expand the menu by Google Cloud Platform, and click IAM & Admin.
3. Click **Service accounts**.
 1. Choose an existing service account from the list or create one.
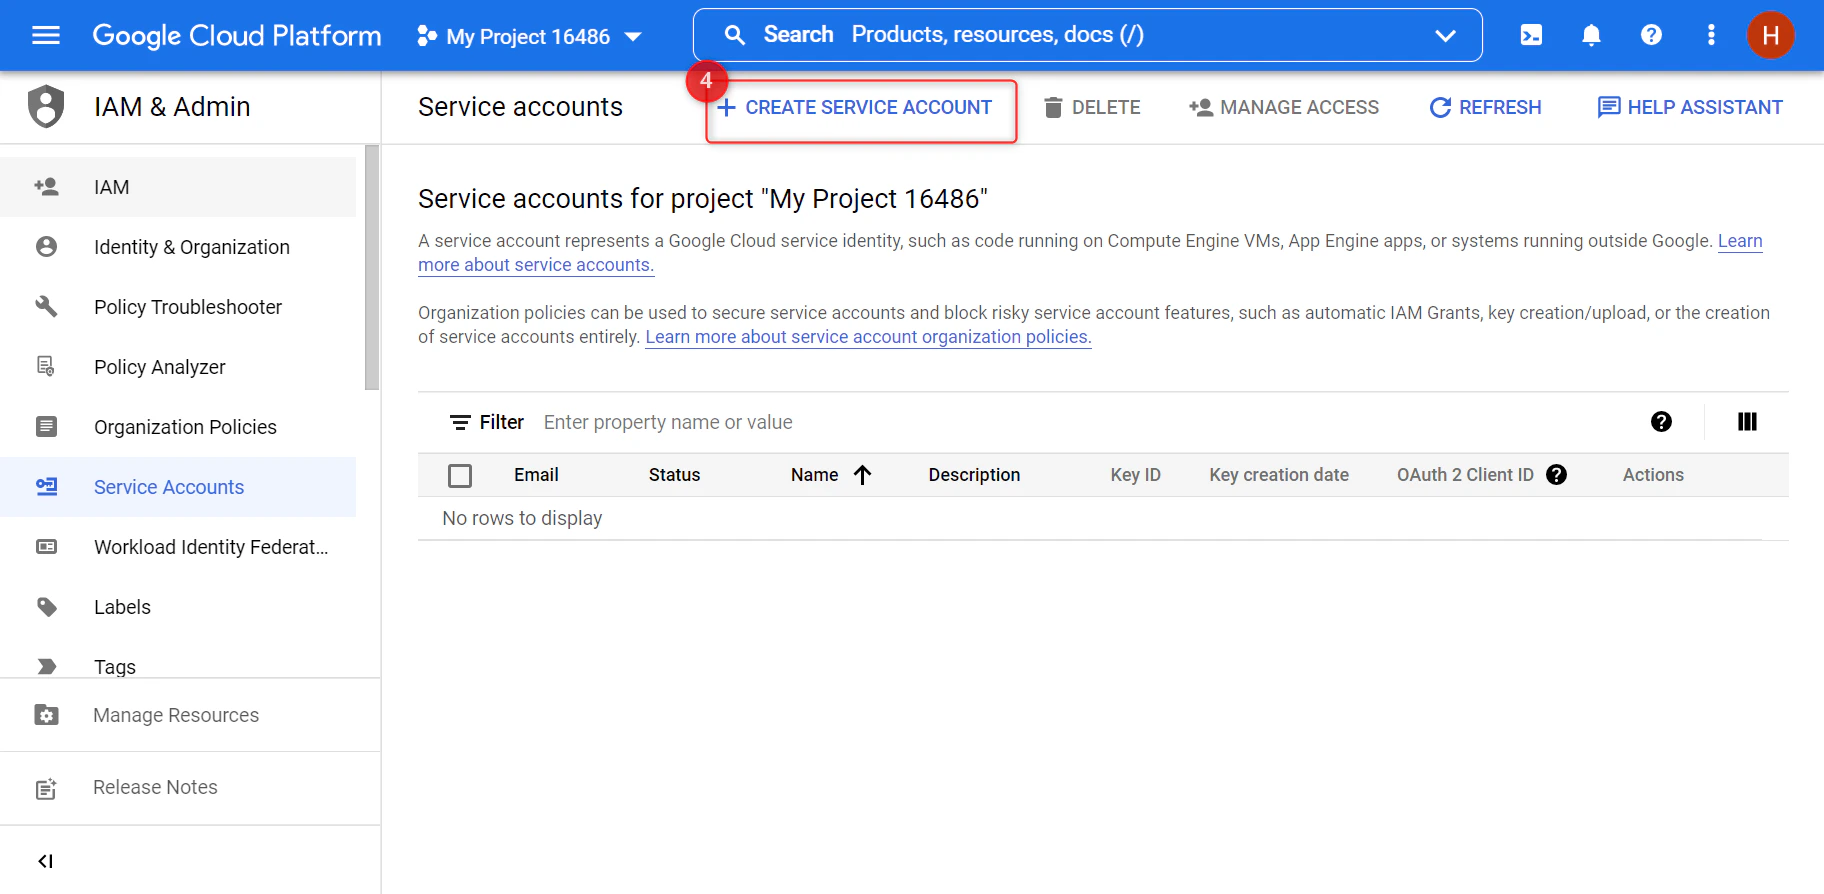 If the button is not visible, create a project first in order to **Create Service Account**.
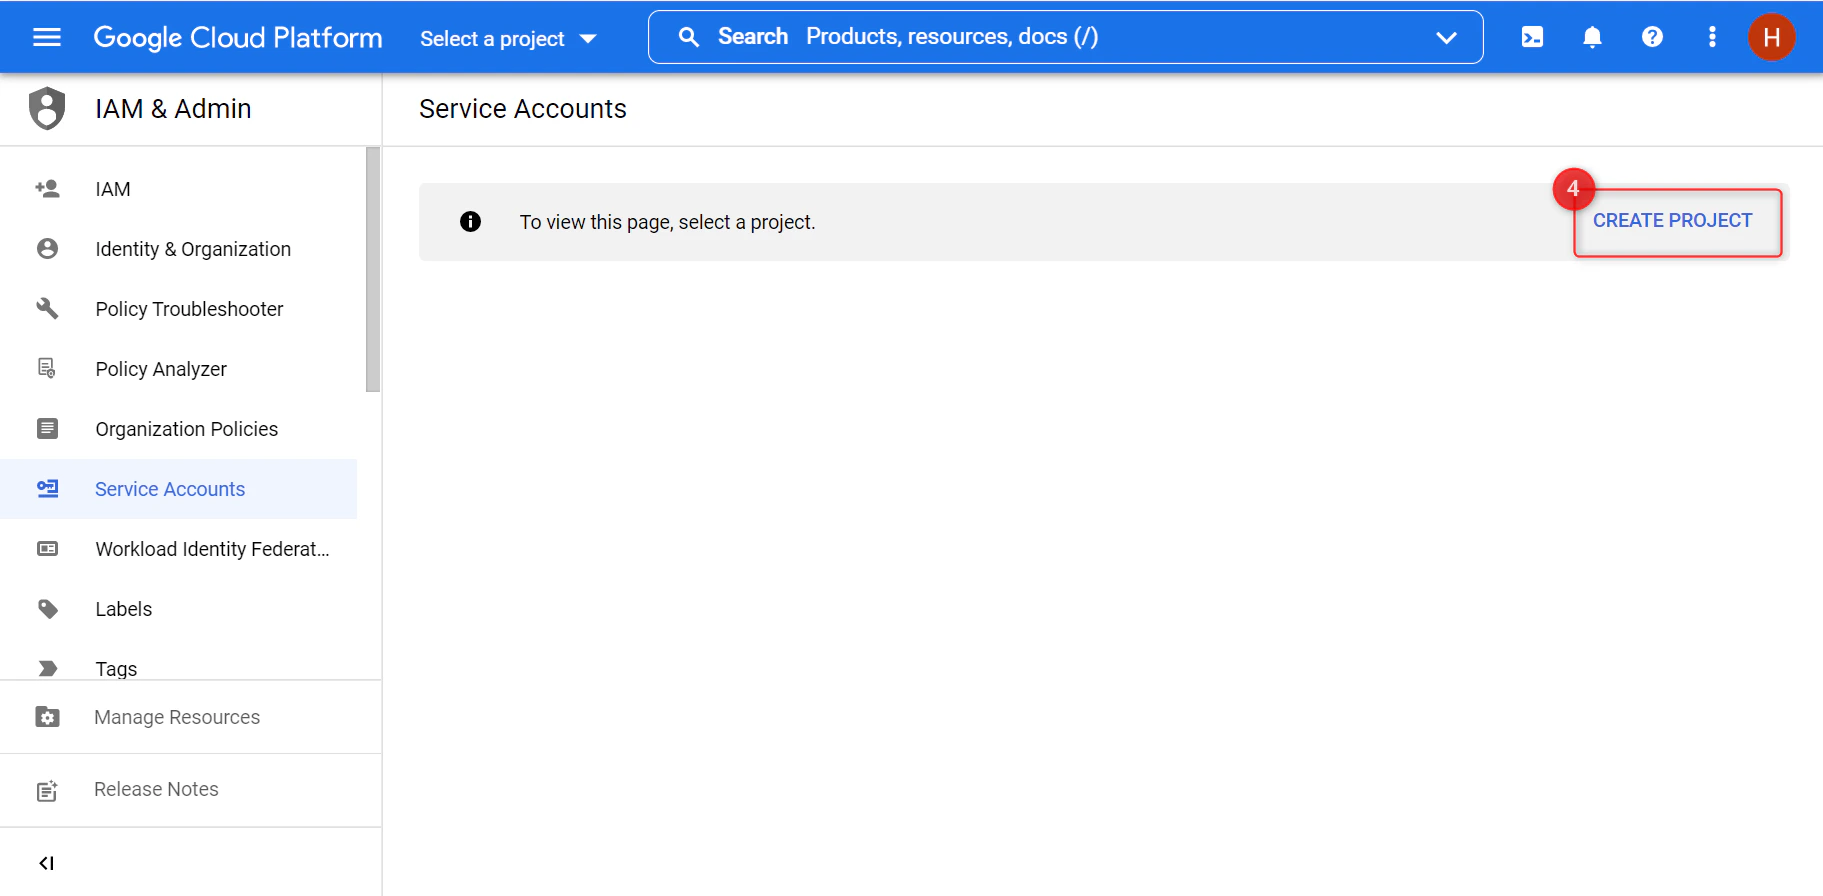 1. Create the service account by entering the name, ID, and description at the **Create Service Account** process. Then grant the access and create the account.
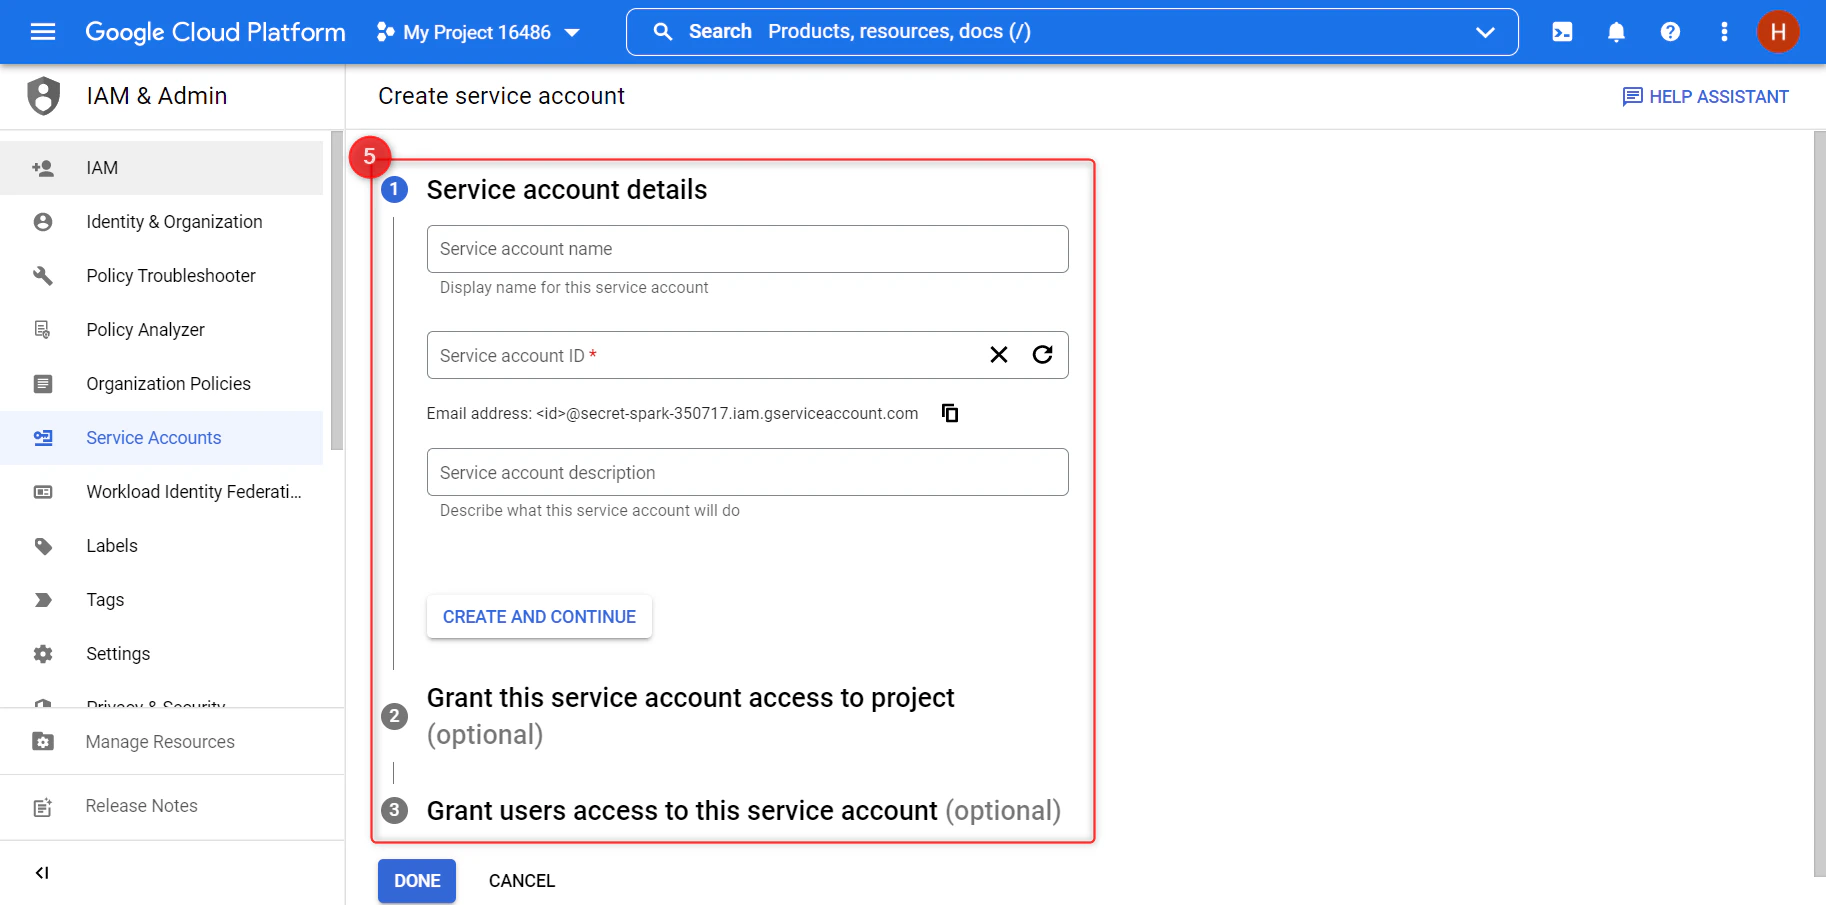 1. Click on Email of the service account.
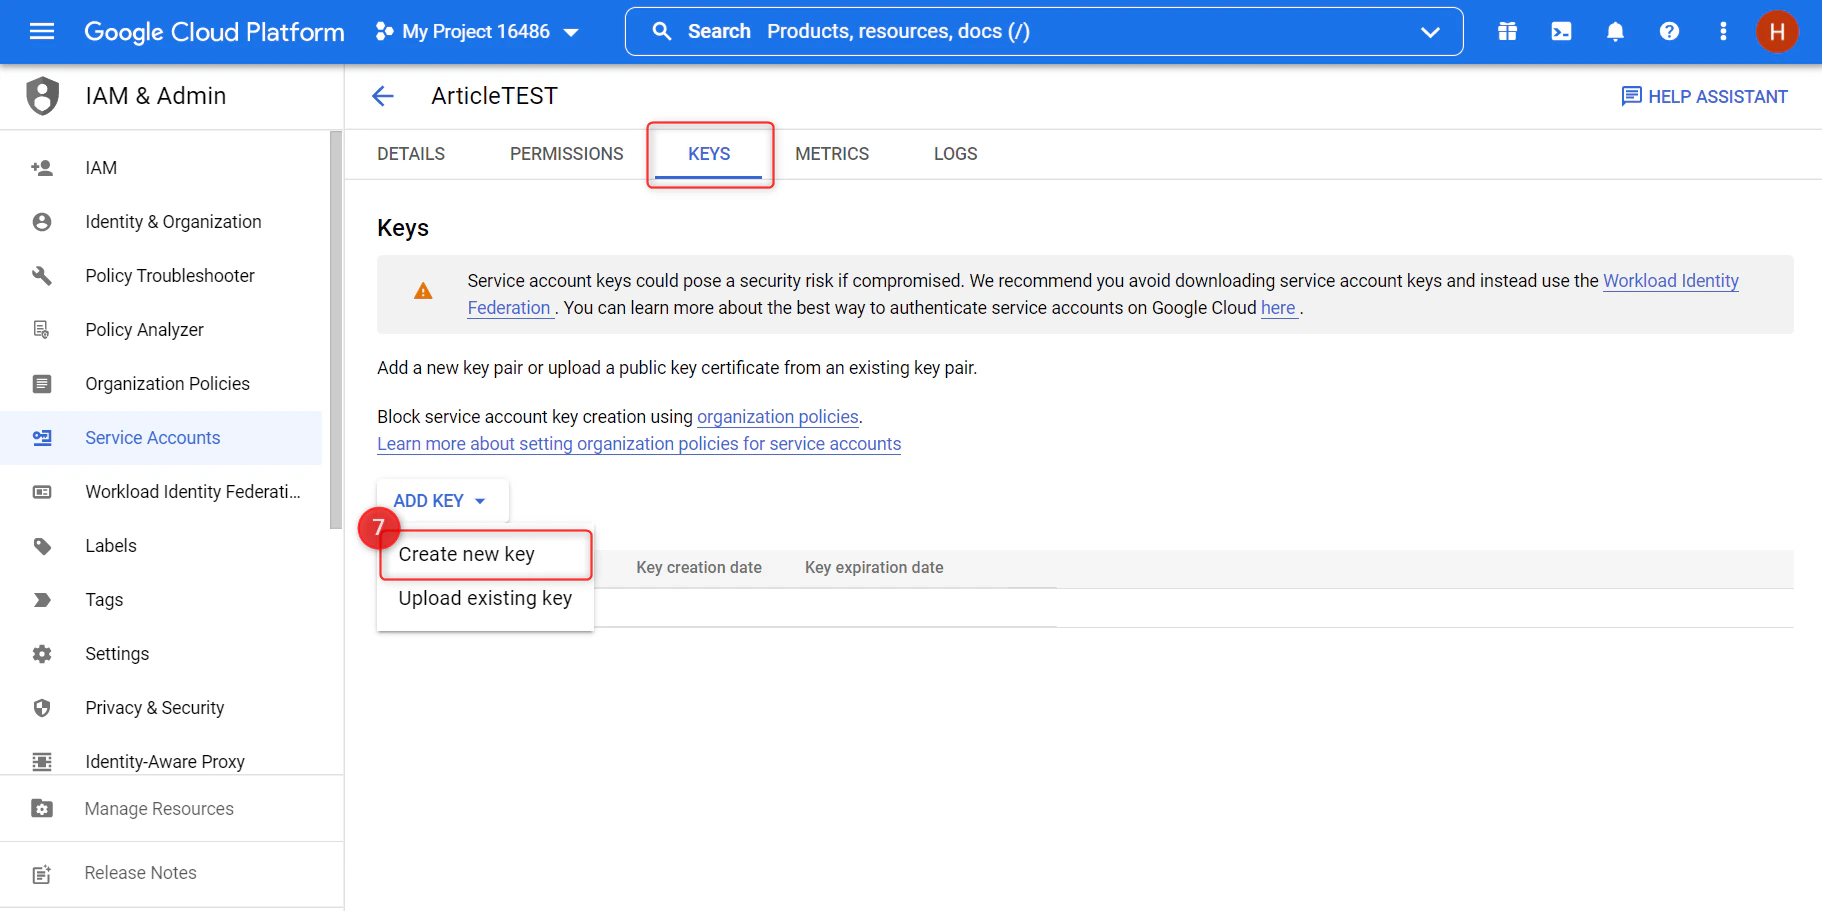
 1. To access the keys, click on the 'KEYS' tab. Click the "Add Key" dropdown and then select 'Create New Key'.
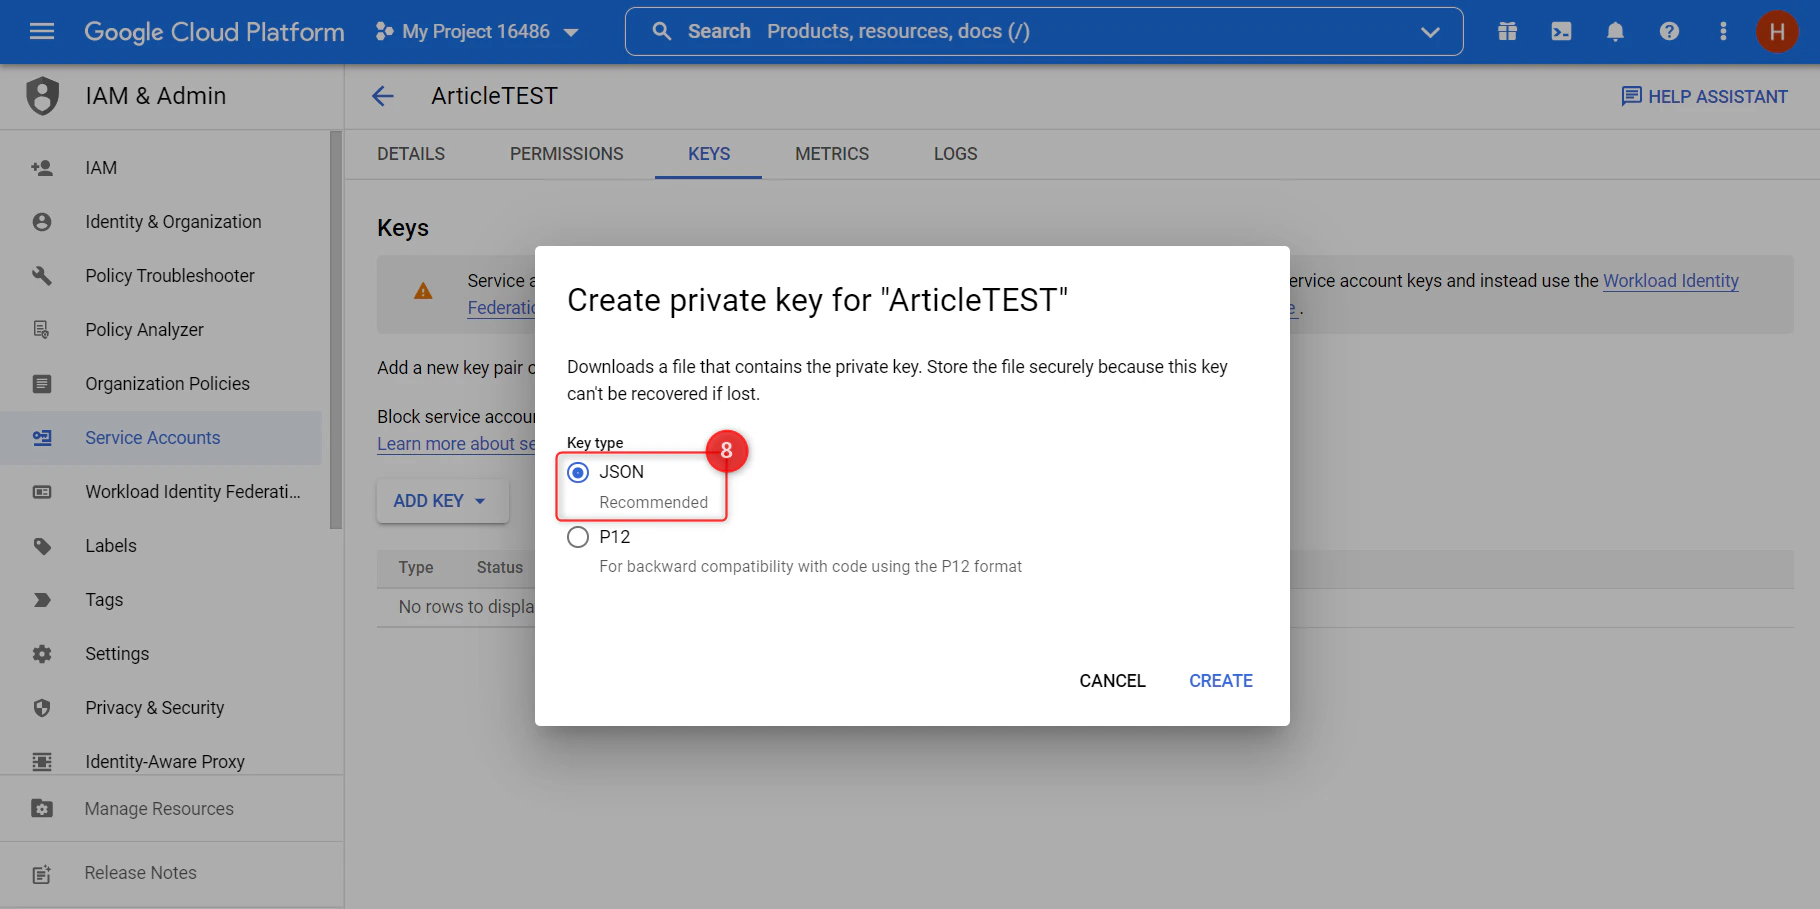
 1. Choose JSON as the key type.
 1. The service account key JSON file is automatically downloaded to your local machine.
2. Copy `private_key` from the downloaded JSON file & Paste it to Data Collector delivery settings.
1. The service account key JSON file is automatically downloaded to your local machine.
2. Copy `private_key` from the downloaded JSON file & Paste it to Data Collector delivery settings.
 ## Snowflake Delivery Configuration Guide
Snowflake configuration is available for 'Datasets' delivery and not available for data collectors (Web Scraper)
**Getting Started**
In order to allow efficient delivery of Datasets to your Snowflake environment, we provide a step-by-step guide to set it up. Just follow these steps:
Firstly, decide if you will use an existing database or create a new one. If you opt for a new database, here's the command you need:
```sh theme={null}
CREATE DATABASE ;
```
Remember to replace `` with the name you want for your database.
Decide if you will use an existing schema or create a new one. By default every database has a PUBLIC schema. If you wish to use a different schema, here's the command you need:
```sh theme={null}
CREATE SCHEMA ;
```
Replace `` with your own schema name.
Choose an existing warehouse or create a new one. When creating a new warehouse, consider Snowflake's recommendations for configuring a warehouse specifically for data loading. Use the following command to create a warehouse:
```sh theme={null}
CREATE WAREHOUSE ;
```
Replace `` with your desired warehouse name.
Next, choose an existing internal named stage or create a new one. To create a new stage, use this command:
```sh theme={null}
CREATE STAGE ;
```
Don't forget to replace `` with your preferred stage name.
You'll need a role that can write to your chosen stage. To create one, use:
```sh theme={null}
CREATE ROLE ;
```
Change `` to your chosen role name.
Now, grant your new role the necessary rights to operate on your chosen warehouse using:
```sh theme={null}
GRANT OPERATE ON WAREHOUSE TO ROLE ;
```
Remember to replace `` and `` with your specific warehouse and role name respectively.
To enable your role to write on the stage, use the command:
```sh theme={null}
GRANT WRITE ON STAGE TO ROLE ;
```
Again, replace `` and `` with your chosen stage and role names.
Next, create a new user for BrightData that will be used to upload data directly into Snowflake. The command is as follows:
```sh theme={null}
create user
PASSWORD = ''
LOGIN_NAME =
MUST_CHANGE_PASSWORD = FALSE
DISABLED = FALSE
COMMENT = 'user for BrightData to upload data directly into Snowflake'
```
Replace ``, ``, and `` with your chosen username, password, and login name.
Finally, grant your new user the privileges of the role you created:
```sh theme={null}
GRANT ROLE TO USER ;
```
Replace `` and `` with your role and user names.
If you have an active [Network Policy](https://docs.snowflake.com/en/user-guide/network-policies) applied in your Snowflake account you need to whiltelist following IPs:
```sh theme={null}
ALTER NETWORK POLICY
SET ALLOWED_IP_LIST=(
,
'35.169.71.210',
'34.233.211.38',
'44.194.183.74',
'54.243.177.151');
```
Replace `` with your network policy name. Replace `` with the list of existing whitelisted IPs.
And that's it! You have now configured your Snowflake environment to receive data from our platform.
If you have any issues or need further assistance, please contact our support team.
If you want to learn more about Data Loading Performance and Warehouse Size Considerations [click here](https://docs.snowflake.com/en/user-guide/warehouses-overview#impact-on-data-loading).
## Snowflake Delivery Configuration Guide
Snowflake configuration is available for 'Datasets' delivery and not available for data collectors (Web Scraper)
**Getting Started**
In order to allow efficient delivery of Datasets to your Snowflake environment, we provide a step-by-step guide to set it up. Just follow these steps:
Firstly, decide if you will use an existing database or create a new one. If you opt for a new database, here's the command you need:
```sh theme={null}
CREATE DATABASE ;
```
Remember to replace `` with the name you want for your database.
Decide if you will use an existing schema or create a new one. By default every database has a PUBLIC schema. If you wish to use a different schema, here's the command you need:
```sh theme={null}
CREATE SCHEMA ;
```
Replace `` with your own schema name.
Choose an existing warehouse or create a new one. When creating a new warehouse, consider Snowflake's recommendations for configuring a warehouse specifically for data loading. Use the following command to create a warehouse:
```sh theme={null}
CREATE WAREHOUSE ;
```
Replace `` with your desired warehouse name.
Next, choose an existing internal named stage or create a new one. To create a new stage, use this command:
```sh theme={null}
CREATE STAGE ;
```
Don't forget to replace `` with your preferred stage name.
You'll need a role that can write to your chosen stage. To create one, use:
```sh theme={null}
CREATE ROLE ;
```
Change `` to your chosen role name.
Now, grant your new role the necessary rights to operate on your chosen warehouse using:
```sh theme={null}
GRANT OPERATE ON WAREHOUSE TO ROLE ;
```
Remember to replace `` and `` with your specific warehouse and role name respectively.
To enable your role to write on the stage, use the command:
```sh theme={null}
GRANT WRITE ON STAGE TO ROLE ;
```
Again, replace `` and `` with your chosen stage and role names.
Next, create a new user for BrightData that will be used to upload data directly into Snowflake. The command is as follows:
```sh theme={null}
create user
PASSWORD = ''
LOGIN_NAME =
MUST_CHANGE_PASSWORD = FALSE
DISABLED = FALSE
COMMENT = 'user for BrightData to upload data directly into Snowflake'
```
Replace ``, ``, and `` with your chosen username, password, and login name.
Finally, grant your new user the privileges of the role you created:
```sh theme={null}
GRANT ROLE TO USER ;
```
Replace `` and `` with your role and user names.
If you have an active [Network Policy](https://docs.snowflake.com/en/user-guide/network-policies) applied in your Snowflake account you need to whiltelist following IPs:
```sh theme={null}
ALTER NETWORK POLICY
SET ALLOWED_IP_LIST=(
,
'35.169.71.210',
'34.233.211.38',
'44.194.183.74',
'54.243.177.151');
```
Replace `` with your network policy name. Replace `` with the list of existing whitelisted IPs.
And that's it! You have now configured your Snowflake environment to receive data from our platform.
If you have any issues or need further assistance, please contact our support team.
If you want to learn more about Data Loading Performance and Warehouse Size Considerations [click here](https://docs.snowflake.com/en/user-guide/warehouses-overview#impact-on-data-loading).