> ## Documentation Index
> Fetch the complete documentation index at: https://brightdata-ipv6-release.mintlify.site/llms.txt
> Use this file to discover all available pages before exploring further.
# Initiate Data Collection & Delivery with IDE Scraper
> Learn how to initiate data collection and set up delivery options using the IDE Scraper. Explore manual, API, and scheduled methods for efficient data scraping.
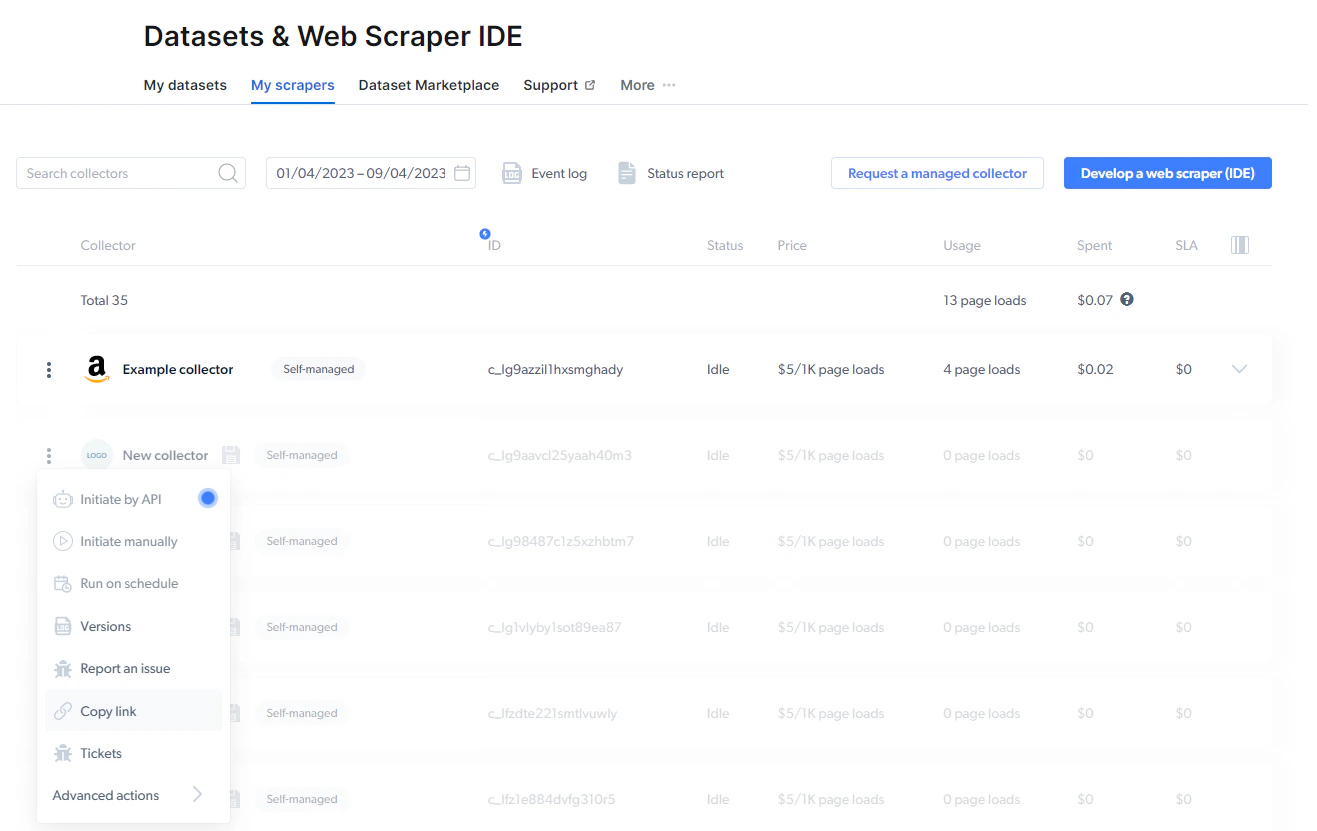
When writing a scraper code on the IDE, the system auto-saves the scraper as a draft to the development environment. From inside the IDE, you can run one page at a time to sample how your scraper will behave. To get a full production run, you need to save scraper to production by clicking the 'Save to production' button at the top right corner of the IDE screen. All scrapers will appear under the **My scrapers** tab in the control panel. Any inactive scraper will be shown in a faded state.
 ## Initiate scraper
To start collecting the data, choose one of three options:
You can start a data collection through API without accessing the Bright Data control panel : [Getting started with API documentation](/api-reference/web-scraper-ide-api/Getting_started_wtih_the_API)
Before initiating an API request, please create an API token. **To create an API token, go to:**\
[Dashboard side menu settings > account settings > API tokens](https://brightdata.com/cp/setting)
## Initiate scraper
To start collecting the data, choose one of three options:
You can start a data collection through API without accessing the Bright Data control panel : [Getting started with API documentation](/api-reference/web-scraper-ide-api/Getting_started_wtih_the_API)
Before initiating an API request, please create an API token. **To create an API token, go to:**\
[Dashboard side menu settings > account settings > API tokens](https://brightdata.com/cp/setting)
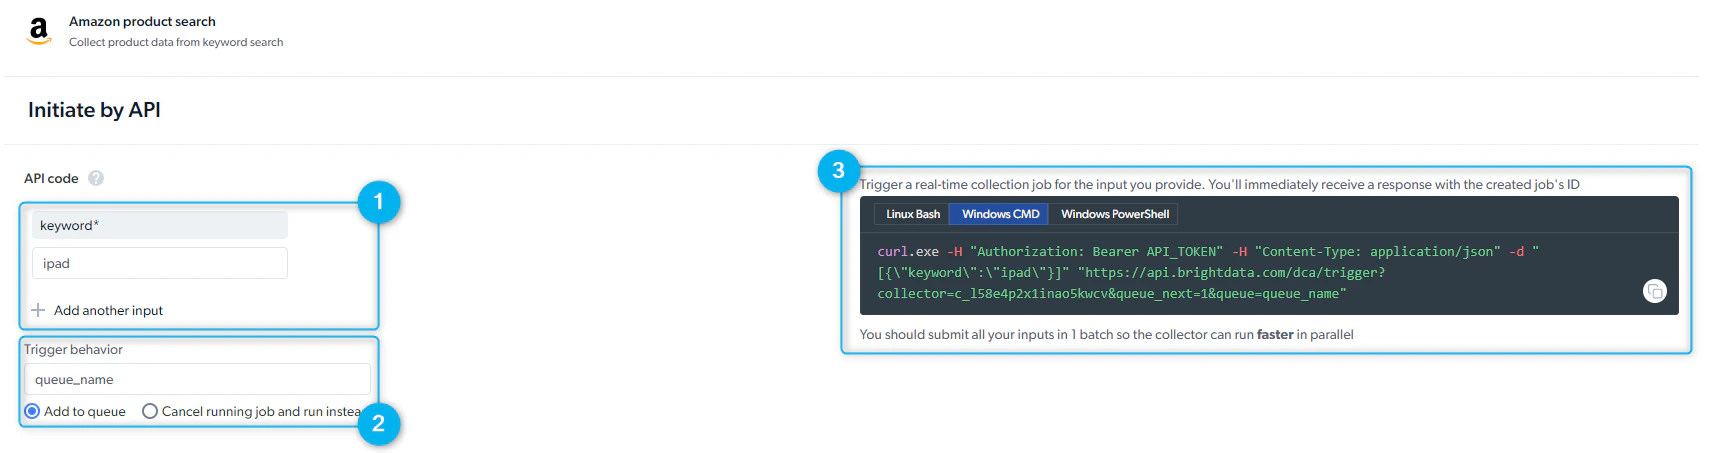 1. **Set Up Inputs Manually** - provide input manually or through the API request
2. **Trigger behavior** - you can add several requests in parallel that are activated according to the order they're defined. You can add another job run to the queue and run more than two jobs simultaneously.
3. **Preview of the API Request** - Bright Data provides you with a REST API call to initiate the scraper. Please select the "Linux Bash" viewer for CURL commands. As soon as you send the request, you will receive a job id.
You will receive the data according to the delivery preferences defined earlier.
Receive data API call is required in order to receive data when delivery preferences is set to API download
Bright Data's control panel makes it easy to get started collecting data.
1. **Set Up Inputs Manually** - provide input manually or through the API request
2. **Trigger behavior** - you can add several requests in parallel that are activated according to the order they're defined. You can add another job run to the queue and run more than two jobs simultaneously.
3. **Preview of the API Request** - Bright Data provides you with a REST API call to initiate the scraper. Please select the "Linux Bash" viewer for CURL commands. As soon as you send the request, you will receive a job id.
You will receive the data according to the delivery preferences defined earlier.
Receive data API call is required in order to receive data when delivery preferences is set to API download
Bright Data's control panel makes it easy to get started collecting data.
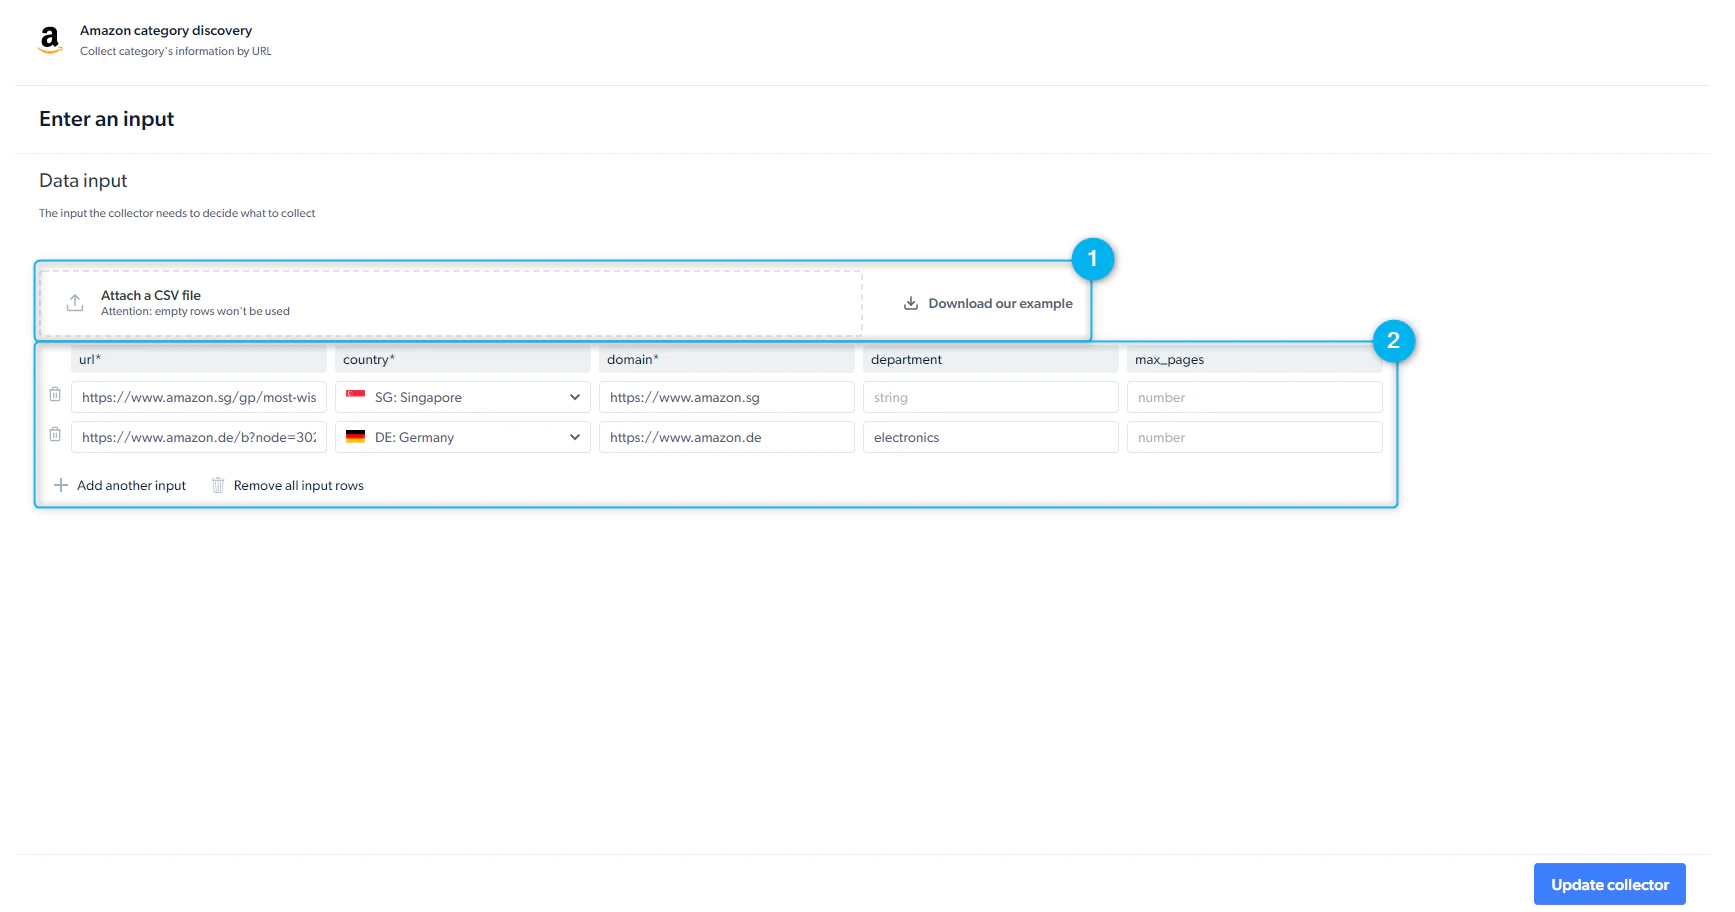
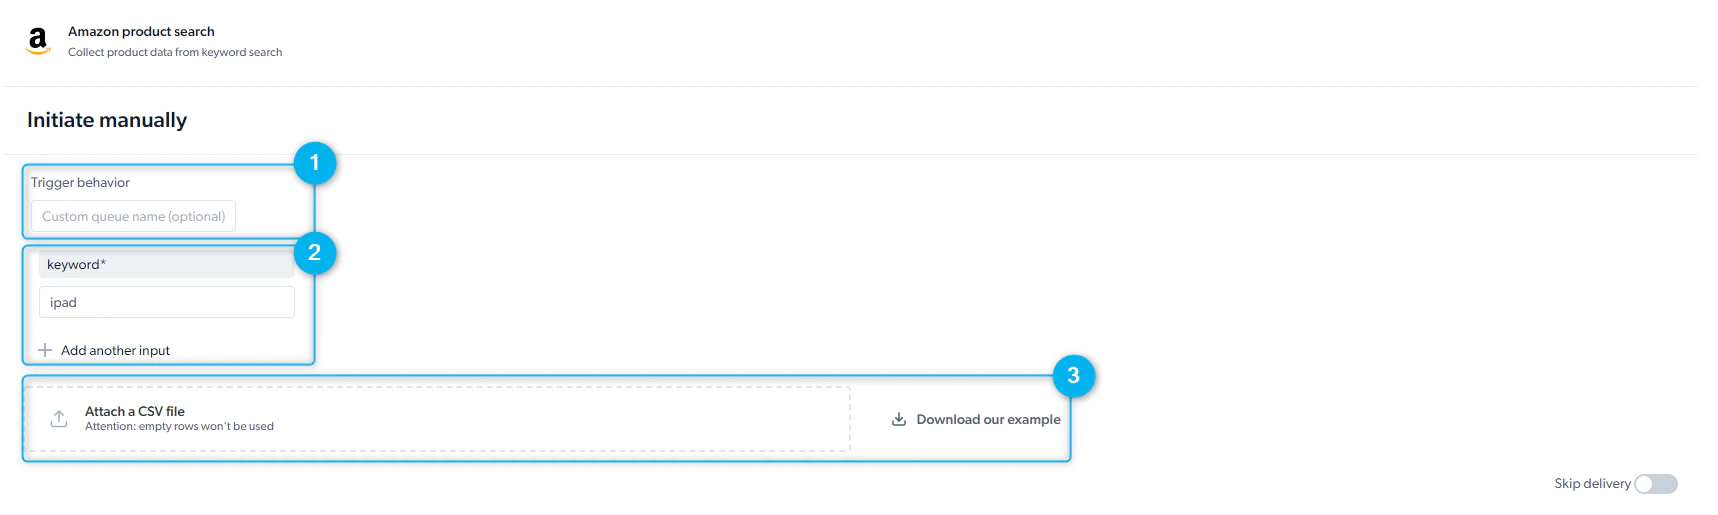 1. **Trigger behavior** - you can add several requests in parallel that are activated according to the order they're defined. You can add another job run to the queue and run more than two jobs simultaneously.
2. **Set up inputs manually**
3. **Upload CSV file** - If you'd like to add a large amount of input, the easiest way is to add them to a CSV file and upload it to the system. For example, a list of URLs.\
See the example provided for reference.
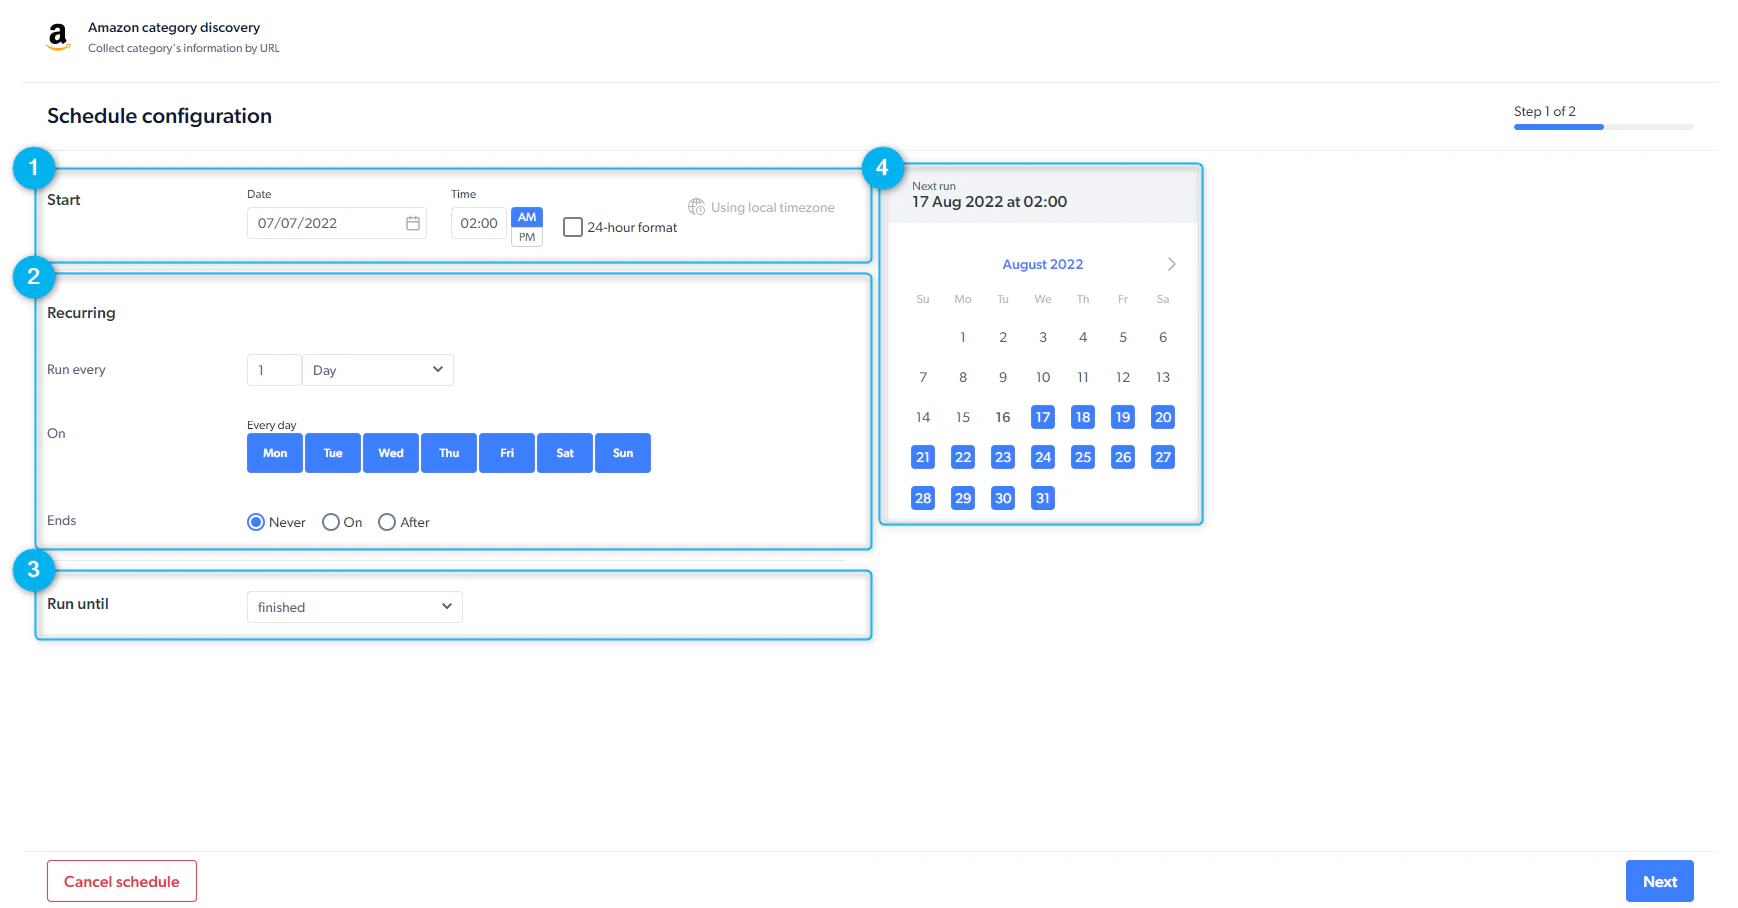
Choose when to initiate the scraper.
**Step One:**
1. Choose a date and time for the scraper to start.
2. Select the frequency it will run (hourly, daily, weekly, etc.)
3. Set a deadline for when a scraper is complete.
4. Review your setup.
1. **Trigger behavior** - you can add several requests in parallel that are activated according to the order they're defined. You can add another job run to the queue and run more than two jobs simultaneously.
2. **Set up inputs manually**
3. **Upload CSV file** - If you'd like to add a large amount of input, the easiest way is to add them to a CSV file and upload it to the system. For example, a list of URLs.\
See the example provided for reference.
Choose when to initiate the scraper.
**Step One:**
1. Choose a date and time for the scraper to start.
2. Select the frequency it will run (hourly, daily, weekly, etc.)
3. Set a deadline for when a scraper is complete.
4. Review your setup.
 **Step Two :**
1. Add a large number of inputs to a CSV file. For instance, a list of URLs. To upload easily without errors, you can download a template of a CSV structure example.
2. Set up Inputs manually
**Step Two :**
1. Add a large number of inputs to a CSV file. For instance, a list of URLs. To upload easily without errors, you can download a template of a CSV structure example.
2. Set up Inputs manually
 ***
## Delivery Options
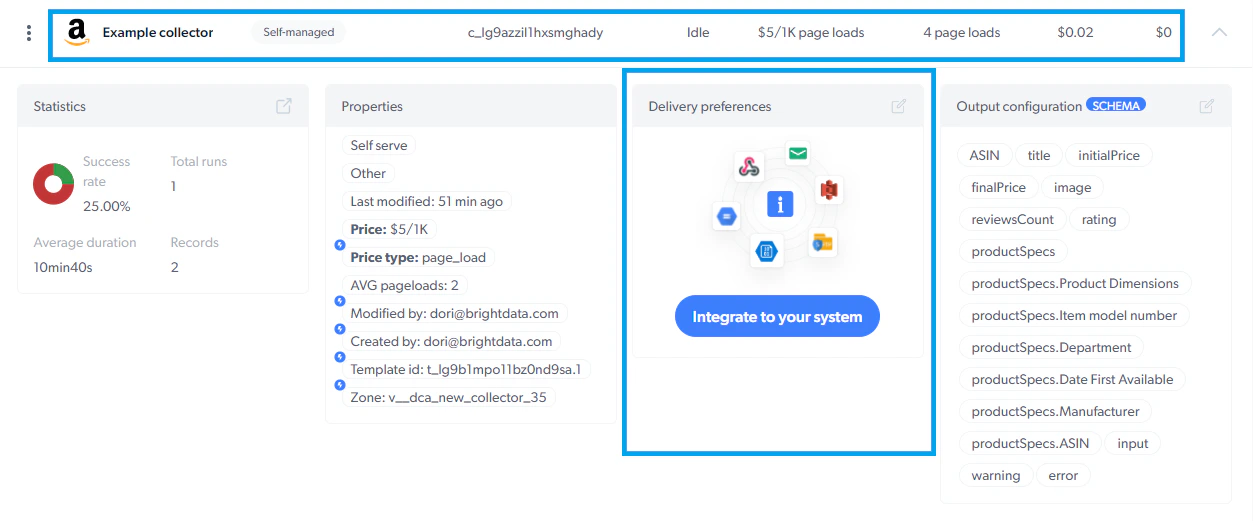
You can set your delivery preferences for the dataset. To do that simply click on the scraper row from the 'My scrapers' tab and then click on 'Delivery preferences'
***
## Delivery Options
You can set your delivery preferences for the dataset. To do that simply click on the scraper row from the 'My scrapers' tab and then click on 'Delivery preferences'
 * Batch : an efficient way of managing large amounts of data
* Split batch : deliver the data in smaller batches as soon as it's ready
* Real-time : is an ideal way to get a fast response for one request
* Skip retries : Do not retry when error occurs. Can speed up collection
* JSON
* NDJSON
* CSV
* XLSX
* Email
* API Download
* Webhook
* Cloud storage providers : Amazon S3, Google Cloud Storage, Azure
* SFTP/FTP
Media files cannot be delivered when it's set to Email or API download
* Result and Errors in separate files
* Result and Errors together in one file
* Only successful results
* Only errors
* Notify when the collection is complete
* Notify success rates
* Notify when an error occurs
### Output schema
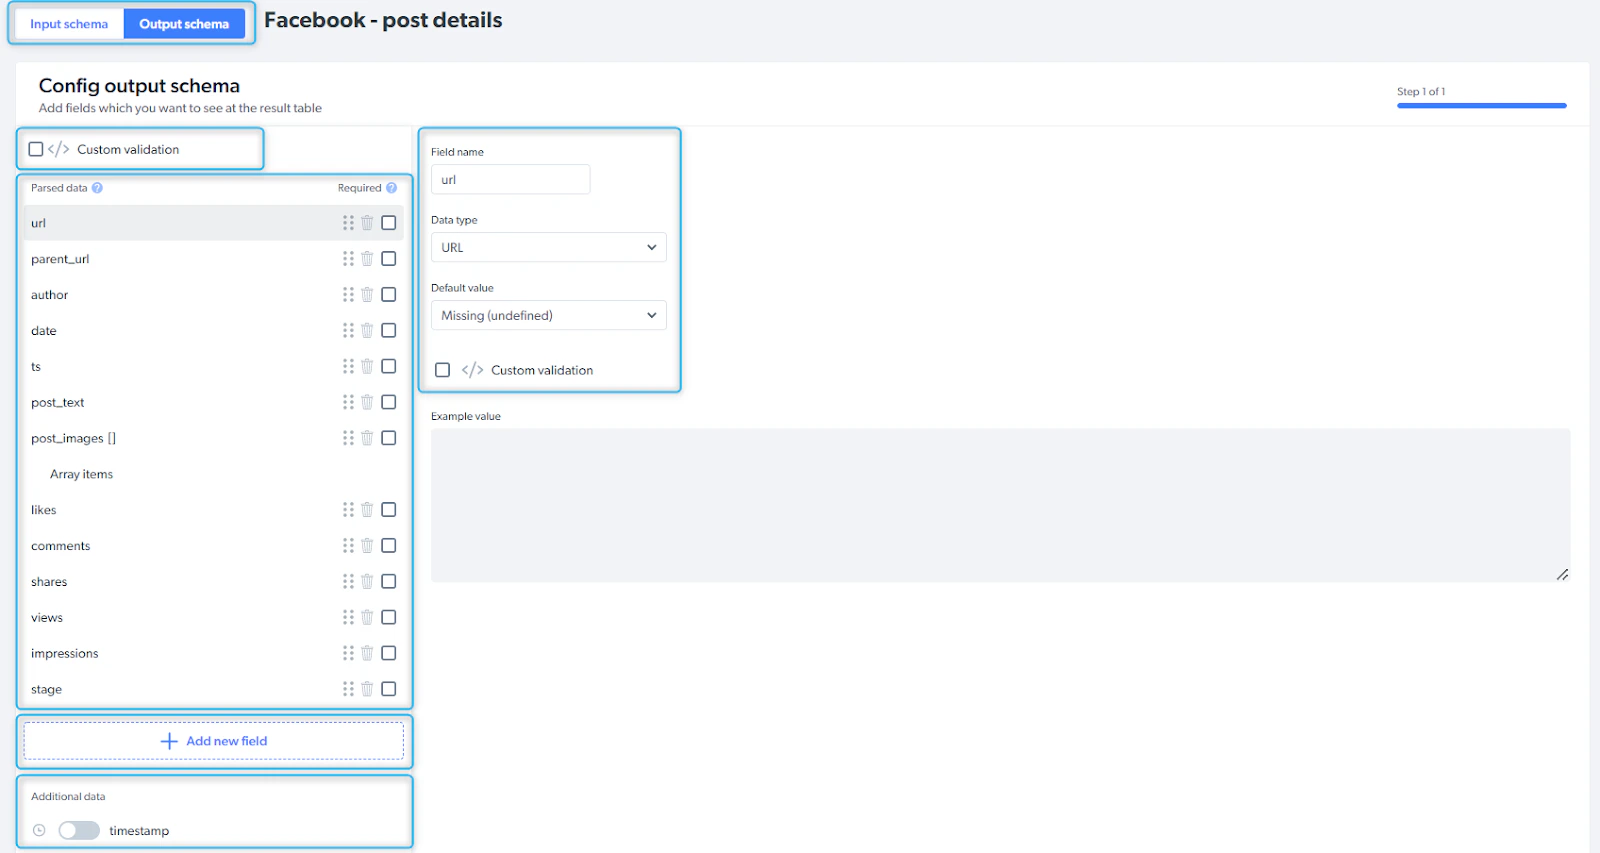
Schema defines the data point structure and how the data will be organized. You can change the schema structure and modify the data points to suit your needs, re-order, set default values, and add additional data to your output configuration. You can add new field names by going into the advanced settings and editing the code.
* Batch : an efficient way of managing large amounts of data
* Split batch : deliver the data in smaller batches as soon as it's ready
* Real-time : is an ideal way to get a fast response for one request
* Skip retries : Do not retry when error occurs. Can speed up collection
* JSON
* NDJSON
* CSV
* XLSX
* Email
* API Download
* Webhook
* Cloud storage providers : Amazon S3, Google Cloud Storage, Azure
* SFTP/FTP
Media files cannot be delivered when it's set to Email or API download
* Result and Errors in separate files
* Result and Errors together in one file
* Only successful results
* Only errors
* Notify when the collection is complete
* Notify success rates
* Notify when an error occurs
### Output schema
Schema defines the data point structure and how the data will be organized. You can change the schema structure and modify the data points to suit your needs, re-order, set default values, and add additional data to your output configuration. You can add new field names by going into the advanced settings and editing the code.
 | | |
| ------------------------- | ------------------------------------------------------------------------------------ |
| **Input / Output schema** | choose the tab you'd like to configure |
| **Custom validation** | validate the schema |
| **Parsed data** | data points collected by the scraper |
| **Add new field** | if you need additional data point, you can add fields and define field name and type |
| **Additional data** | additional information you can add to the schema (timestamp, screenshot, etc.) |
| | |
| ------------------------- | ------------------------------------------------------------------------------------ |
| **Input / Output schema** | choose the tab you'd like to configure |
| **Custom validation** | validate the schema |
| **Parsed data** | data points collected by the scraper |
| **Add new field** | if you need additional data point, you can add fields and define field name and type |
| **Additional data** | additional information you can add to the schema (timestamp, screenshot, etc.) |