

下载 SSL 证书
- 右键单击此链接上的将该文件“另存为”到您的硬盘中。
- Unzip the file and choose the certificate to use. Most users - espcially if they are new to Bright Data - should use the *new SSL certificate.
在代码中使用 SSL 证书
如果您编写抓取代码,在大多数情况下,您无需在环境中安装 SSL 证书。 只需在代码中加载 SSL 证书即可。 例如,对于 CURL:curl --proxy brd.superproxy.io:33335 --proxy-user brd-customer-<account-id>-zone-<zone-name>:<zone-password> --cacert <PATH TO CA.CRT> "https://geo.brdtest.com/mygeo.json"
安装 SSL 证书
在某些情况下,例如使用某些不允许从硬盘加载证书的第三方工具时,您仍需要在计算机上安装 SSL 证书。Where do I install the certificate?
The SSL certificate needs to be installed on the host that is running the actual scraping code or application. In most cases this is your PC but, if you use a cloud-hosted server to run your code, you need to install the SSL certificate on the server itself.Installation instructions
这只需要 2 分钟,只需按照以下说明操作即可:- Windows
- Chrome
- Firefox
- Linux
- macOS
- iOS
- Android
- 如果您还没有这样做,请右键单击此链接,将文件“另存为”到您的硬盘中: https://brightdata.com/static/brightdata_proxy_ca.zip
- 双击 ca.crt 文件
- 按照 Windows 的说明安装证书。
- 重启电脑
- 重启,您就可以连接到所需的 Bright Data 产品(住宅代理、Web Unlocker 或 SERP API)
- Once you’ve download the certificate file (see the instruction on the top of this article)
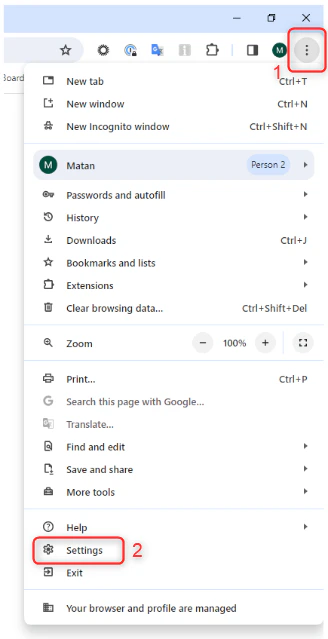
Go to Browser settings
Go to Browser settings
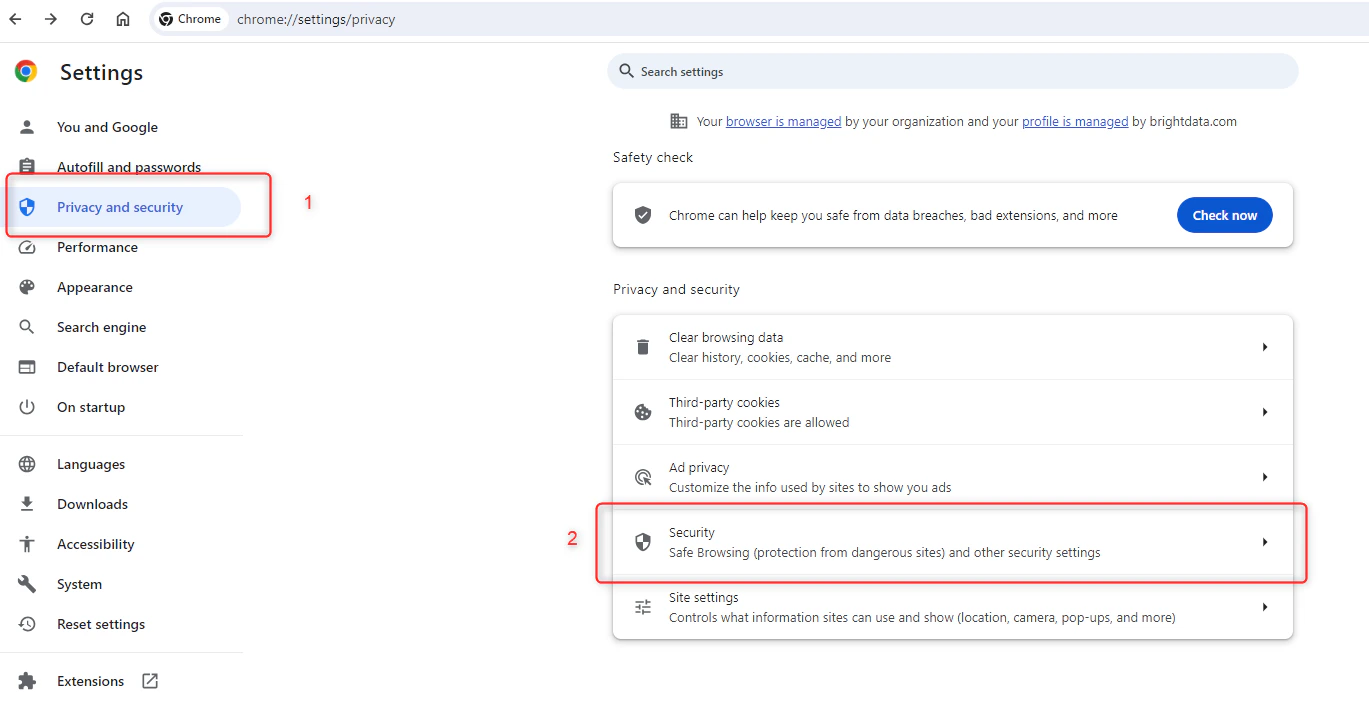
Go to 隐私 and security and click on 安全
Go to 隐私 and security and click on 安全
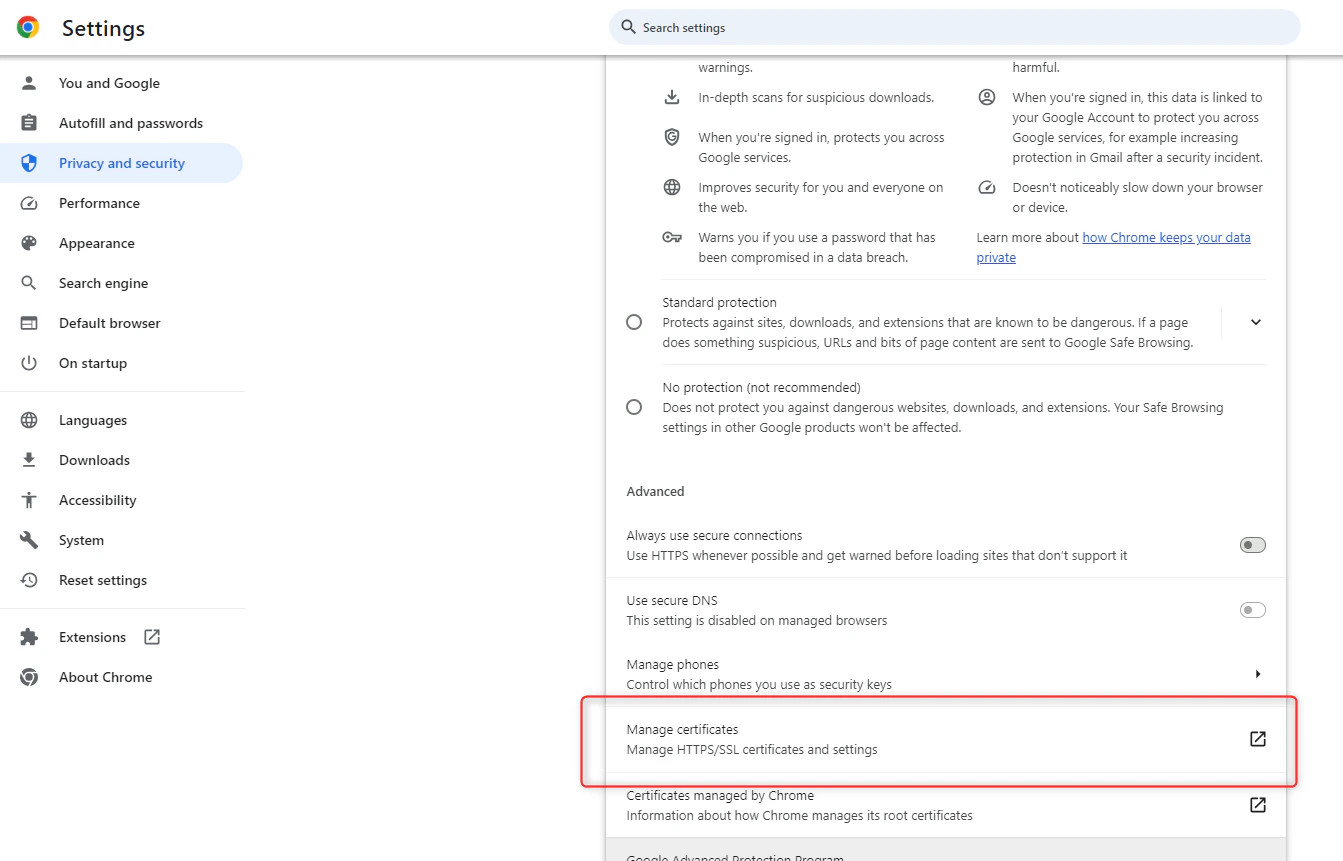
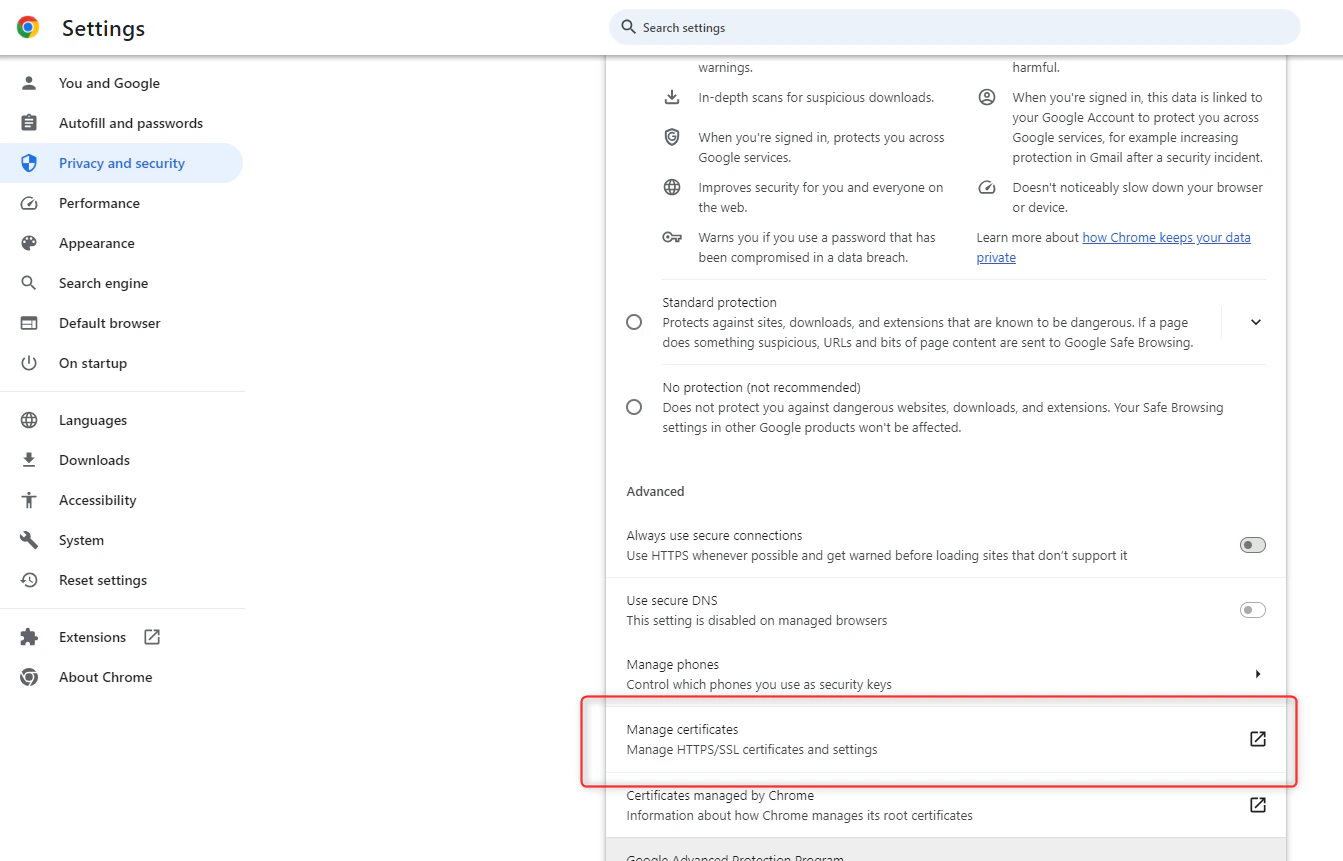
Scroll down and click on Manage certificate
Scroll down and click on Manage certificate
Go to Trusted Certification Authorities and click Import
Go to Trusted Certification Authorities and click Import
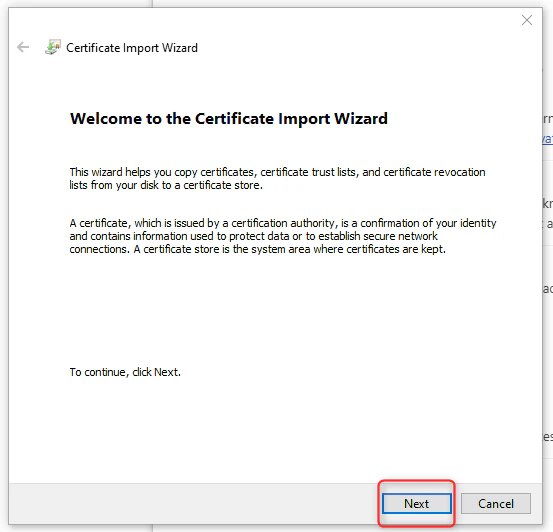
Click on Next
Click on Next
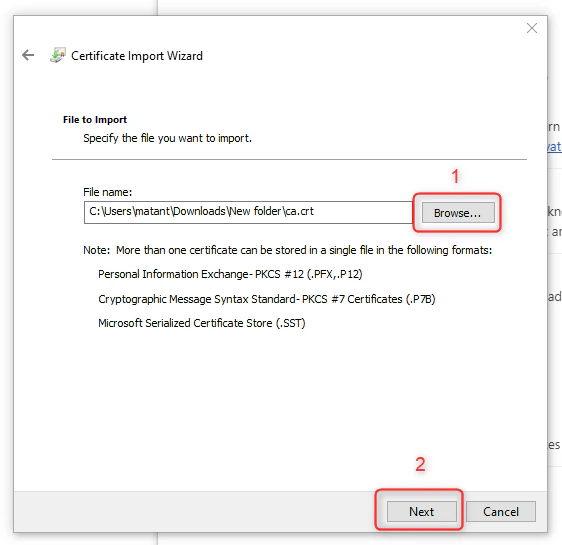
Click Browse and select the certificate you just downloaded, and click Next
Click Browse and select the certificate you just downloaded, and click Next
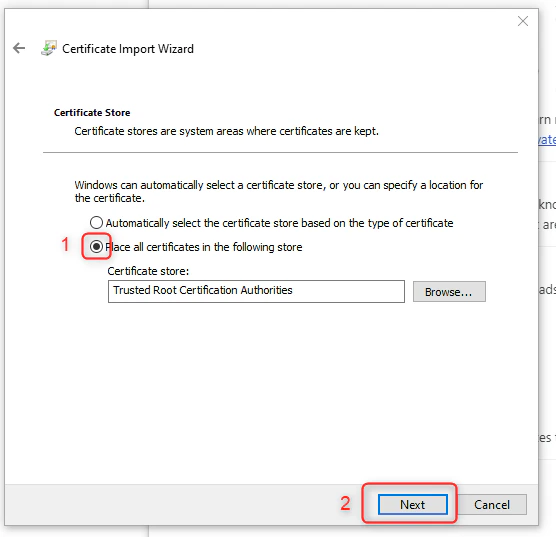
Select "Place all certificates in the following store" and click Next
Select "Place all certificates in the following store" and click Next
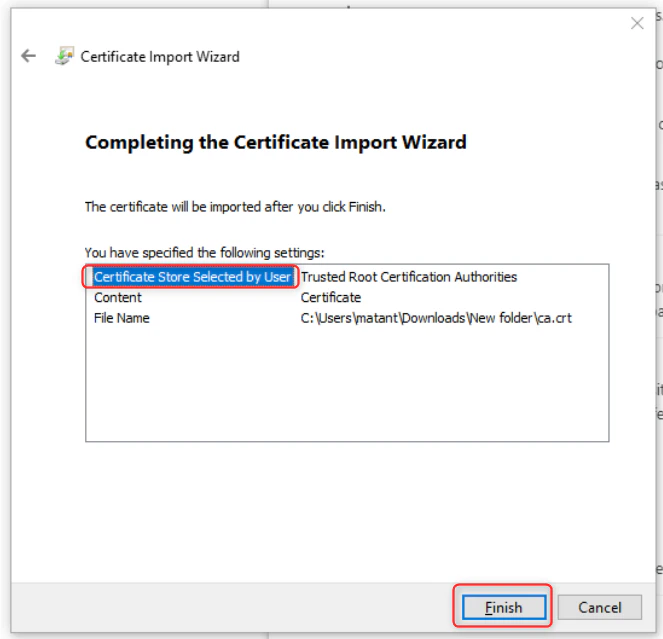
Make sure Certificate Store Selected by User is "Trusted Root Certification Authorities", and click Finish
Make sure Certificate Store Selected by User is "Trusted Root Certification Authorities", and click Finish
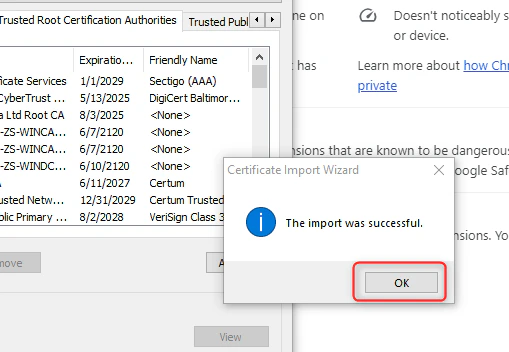
Click OK
Click OK
- Type in the address bar:
about:preferences#advanced - Under “安全” click “View Certificates”
- Select the authorities tab, and click “Import” button below
- Browse to the directory you downloaded the certificate file to, select the certificate file and click “Open”
- In the popup box click the checkbox “Trust this CA to identify websites”
- Click OK to complete the installation
- Make sure Bright Data proxy is configured as Firefox’s proxy, and browse thru proxy to a protected website
- Copy the downloaded certificate file
ca.crtto the/usr/local/share/ca-certificates/folder. - Run
sudo update-ca-certificates. The output of the command should state that 1 certificate was added. - Go to an SSL-protected website to check that everything is working as cted.
- Double-click the downloaded certificate file. You will see the “Keychain Access” application.
- Double-click the “luminati.io” certificate to see a popup with certificate settings.
- Select “Always Trust” in the “When using this certificate” dropdown.
- Close the popup enter your credentials when asked.
- Restart your browser and go to an SSL-protected website to check that everything is working as expected.
- Open up Safari
- Navigate to this page and download the certificate using this link, but first read the following two items.
- Click Install and provide your passcode
- Click Install in the top right corner and then Done
- Go to iPhone “Settings”
- Go to “About”
- Go to “Certificate Trust Settings”
- Enable the “luminati.io” certificate
- You can now go to an SSL-protected website in any browser installed in your system to check that everything is working as expected.
- Download the following certificate and save it on your phone.
- On your phone, look for the certificate through ‘My files’.
- Enter your password and press next.
- Choose a name, preferably something you will recognize like Bright Data.
- Under ‘Used for’, choose ‘VPN and apps’ and click OK.
- You can now go to an SSL-protected website in any browser installed in your system to check that everything is working as expected.
如何忽略 SSL 错误?
在某些情况下,您需要安装我们的证书或忽略 SSL 错误,才能访问特定产品或功能。 如果您不想安装我们的证书,则可以忽略 SSL 错误。 请查看以下不同编程语言的代码片段,高亮部分是为忽略 SSL 错误而需要添加到代码中的内容。# Add -k to ignore ssl errors
curl --proxy brd.superproxy.io:33335 --proxy-user brd-customer-<customer_id>-zone-<zone_name>:<zone_password> -k "http://lumtest.com/myip.json"
#!/usr/bin/env node
/*This sample code assumes the request-promise package is installed. If it is not installed run: "npm install request-promise"*/
require('request-promise')({
    url: 'http://lumtest.com/myip.json',
    proxy: 'http://brd-customer-<customer_id>-zone-<zone_name>:<zone_password>@brd.superproxy.io:33335',

    // Make sure you set reject rejectUnauthorized to false
    rejectUnauthorized: false,
})
.then(function(data){ console.log(data); },
    function(err){ console.error(err); });
#!/usr/bin/env python
print('If you get error "ImportError: No module named \'six\'" install six:\n'+\
    '$ sudo pip install six');

import sys

# Make sure you add these two line to ignore ssl error
import ssl
ssl._create_default_https_context = ssl._create_unverified_context


if sys.version_info[0]==2:
    import six
    from six.moves.urllib import request
    opener = request.build_opener(
        request.ProxyHandler(
            {'http': 'http://brd-customer-<customer_id>-zone-<zone_name>:<zone_password>@brd.superproxy.io:33335',
            'https': 'http://brd-customer-<customer_id>-zone-<zone_name>:<zone_password>@brd.superproxy.io:33335'}))
    print(opener.open('http://lumtest.com/myip.json').read())

if sys.version_info[0]==3:
    import urllib.request
    opener = urllib.request.build_opener(
        urllib.request.ProxyHandler(
            {'http': 'http://brd-customer-<customer_id>-zone-<zone_name>:<zone_password>@brd.superproxy.io:33335',
            'https': 'http://brd-customer-<customer_id>-zone-<zone_name>:<zone_password>@brd.superproxy.io:33335'}))
    print(opener.open('http://lumtest.com/myip.json').read())
using System;
using System.Net;

class Example
{
    static void Main()
    {

        // Make sure you add this line to ignore ssl error
        ServicePointManager.ServerCertificateValidationCallback += (sender, cert, chain, ssl政策Errors) => true;

        var client = new WebClient();
        client.Proxy = new WebProxy("brd.superproxy.io:33335");
        client.Proxy.Credentials = new NetworkCredential("brd-customer-<customer_id>-zone-<zone_name>", "<zone_password>");
        Console.WriteLine(client.DownloadString("http://lumtest.com/myip.json"));
    }
}
#!/usr/bin/ruby

require 'uri'
require 'net/http'
require 'net/https'

uri = URI.parse('http://lumtest.com/myip.json')
proxy = Net::HTTP::Proxy('brd.superproxy.io', 33335, 'brd-customer-<customer_id>-zone-<zone_name>', '<zone_password>')

req = Net::HTTP::Get.new(uri)

# Make sure you add verify_mode => OpenSSL::SSL::VERIFY_NONE
result = proxy.start(uri.host,uri.port, :use_ssl => uri.scheme == 'https', :verify_mode => OpenSSL::SSL::VERIFY_NONE) do |http|
    http.request(req)

send

puts result.body
package example;

import org.apache.http.HttpHost;
import org.apache.http.client.fluent.*;

public class Example {
    public static void main(String[] args) throws Exception {
        HttpHost proxy = new HttpHost("brd.superproxy.io", 33335);
        String res = Executor.newInstance()
            .auth(proxy, "brd-customer-<customer_id>-zone-<zone_name>", "<zone_password>")
            .execute(Request.Get("http://lumtest.com/myip.json").viaProxy(proxy))
            .returnContent().asString();
        System.out.println(res);
    }
}

/*In the above example, we are not explicitly ignoring SSL
I will share with you a short code I wrote that does ignore SSL using JAVA (was taken from cloud proxy manager examples) */

import java.io.*;
import java.net.*;
import java.security.cert.X509Certificate;
import javax.net.ssl.*;
import java.util.Base64;

public class Example {
    public static void main(String[] args) throws Exception {
        // Disable restricted headers for proxy authentication
        System.setProperty("jdk.http.auth.tunneling.disabledSchemes", "");

        // Set up a TrustManager that does not validate certificate chains
        SSLContext sc = SSLContext.getInstance("SSL");

        TrustManager trust_manager = new X509TrustManager() {
            public X509Certificate[] getAcceptedIssuers() {
                return null;
            }

            public void checkClientTrusted(X509Certificate[] certs, String authType) {
            }

            public void checkServerTrusted(X509Certificate[] certs, String authType) {
            }
        };
        TrustManager[] trust_all = new TrustManager[] { trust_manager };
        sc.init(null, trust_all, new java.security.SecureRandom());
        HttpsURLConnection.setDefaultSSLSocketFactory(sc.getSocketFactory());

        // Set up the proxy and open a connection
        URL url = new URL("https://geo.brdtest.com/mygeo.json");
        Proxy proxy = new Proxy(Proxy.Type.HTTP, new InetSocketAddress("brd.superproxy.io", 33335));
        URLConnection yc = url.openConnection(proxy);

        // Set default Authenticator for proxy authentication
        Authenticator.setDefault(new Authenticator() {
            @Override
            public PasswordAuthentication getPasswordAuthentication() {
                return new PasswordAuthentication("brd-customer-<customer_id>-zone-<zone_name>", "<zone_password>".toCharArray());
            }
        });

        // Read and print the response from the server
        BufferedReader in = new BufferedReader(new InputStreamReader(yc.getInputStream()));
        String inputLine;
        while ((inputLine = in.readLine()) != null)
            System.out.println(inputLine);
        in.close();
    }
}
Imports System.Net

Module Module1
    Sub Main()

        ' Make sure you add this line to ignore ssl error
        ServicePointManager.ServerCertificateValidationCallback = Function(se, cert, chain, sslerror) True

        Dim Client As New WebClient
        Client.Proxy = New WebProxy("http://brd.superproxy.io:33335")
        Client.Proxy.Credentials = New NetworkCredential("brd-customer-<customer_id>-zone-<zone_name>", "<zone_password>")
        Console.WriteLine(Client.DownloadString("http://lumtest.com/myip.json"))
    End Sub
End Module
<?php
$curl = curl_init('http://lumtest.com/myip.json');
curl_setopt($curl, CURLOPT_PROXY, 'http://brd.superproxy.io:33335');
curl_setopt($curl, CURLOPT_PROXYUSERPWD, 'brd-customer-<customer_id>-zone-<zone_name>:<zone_password>');

// Make sure you add this line to ignore ssl error
curl_setopt($curl, CURLOPT_SSL_VERIFYPEER, 0);

curl_exec($curl);
?>
#!/usr/bin/perl

use LWP::UserAgent;

# Make sure you add this line to ignore ssl error
use IO::Socket::SSL qw( SSL_VERIFY_NONE );

my $agent = LWP::UserAgent->new();
$agent->proxy(['http', 'https'], "http://brd-customer-<customer_id>-zone-<zone_name>:<zone_password>\@brd.superproxy.io:33335");
$agent->ssl_opts(verify_hostname => 0, SSL_verify_mode => SSL_VERIFY_NONE);
print $agent->get('http://lumtest.com/myip.json')->content();