Documentation Index
Fetch the complete documentation index at: https://brightdata-ipv6-release.mintlify.app/llms.txt
Use this file to discover all available pages before exploring further.
Expand to get your Bright Data Proxy Access Information
Expand to get your Bright Data Proxy Access Information
Your proxy access information
Bright Data proxies are grouped in “Proxy zones”. Each zone holds the configuration for the proxies it holds.To get access to the proxy zone:- Login to Bright Data control panel
- Select the proxy zone or setup a new one
- Click on the new zone name, and select the Overview tab.
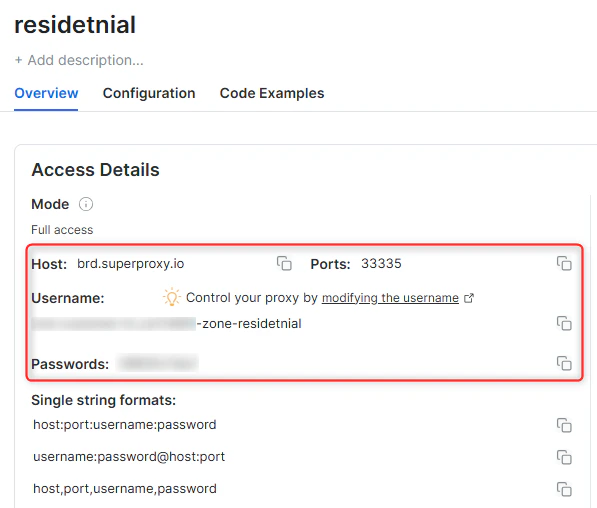
- In the overview tab, under Access details you can find the proxy access details, and copy them to clipboard on click.
- You will need: Proxy Host, Proxy Port, Proxy Zone username and Proxy Zone password.
- Click on the copy icons to copy the text to your clipboard and paste in your tool’s proxy configuration.
Access Details Section Example
Residential proxy access
To access Bright Data’s Residential Proxies you will need to either get verified by our compliance team, or install a certificate. Read more…Targeting search engines?
If you target a search engine like google, bing or yandex, you need a special Search Engine Results Page (SERP) proxy API. Use Bright Data SERP API to target search engines. Click here to read more about Bright Data SERP proxy API.Correct setup of proxy test to avoid “PROXY ERROR”
In many tools you will see a “test proxy” function, which performs a conncectivity test to your proxy, and some add a geolocation test as well, to identify the location of the proxy. To correctly test your proxy you should target those search queries to:https://geo.brdtest.com/welcome.txt .Some tools use popular search engines (like google.com) as a default test target. Bright Data will block those requests and you tool will show proxy error although your proxy is perfectly fine.If your proxy test fails, this is probably the reason. Make sure that your test domain is not a search engine (this is done in the tool configuration, and not controlled by Bright Data).What is ChangeDetection?
ChangeDetection is a powerful tool for monitoring website updates. It allows you to track content changes, receive notifications, and analyze updates in real-time. Whether you’re monitoring competitors, prices, or product availability, ChangeDetection ensures you’re always informed. By integrating Bright Data, you can enhance privacy, bypass restrictions, and manage multiple monitoring tasks seamlessly.How to Integrate Bright Data With ChangeDetection
Step 1. Install and Launch ChangeDetection 1. Visit the ChangeDetection website and download the application for your operating system.2. Install ChangeDetection and launch the application.
3. Log in to your account to access the dashboard. Step 2. Configure Proxy Settings 1. Open the Settings menu from the ChangeDetection dashboard.
2. Navigate to the Network Settings or Proxy Settings section. Step 3. Enter Your Bright Data Proxy Details
-
In the proxy configuration field, input your Bright Data proxy details:
- Protocol: Select HTTP, HTTPS, or SOCKS5 depending on your proxy type.
-
Host: Enter
http://brd.superproxy.io/. - Port: Use the port number provided in your Bright Data dashboard.
- Username: Enter your Bright Data username.
- Password: Enter your Bright Data password.
For geo-targeted proxies, include the country code in your username (e.g.,
your-username-country-US for a US-based proxy).-
Test the proxy connection to ensure it is active:
- In the same settings menu, look for a Test Proxy or Validate Proxy button.
- Run the test to confirm that the proxy is working as expected.
- Save your settings to apply the configuration.
- Return to the ChangeDetection dashboard and start adding websites to monitor.
- Configure individual tasks as needed, ensuring they utilize the proxy settings for privacy and efficiency.